> ## Documentation Index
> Fetch the complete documentation index at: https://docs.galileo.ai/llms.txt
> Use this file to discover all available pages before exploring further.
# Weather Vibes Agent
> Learn how to build an Agentic System for a smart weather application in a Python-based tech stack
## Overview
This cookbook demonstrates how to build an agentic system for a smart weather application in a Python-based tech stack. We'll create a Weather Vibes agent that not only gets the weather, but recommends a song to set the mood based on the weather. Thanks to Galileo's Python SDK we'll be able to check the application's performance and tool selection.
### **What you'll build:**
A command-line agent that:
1. Fetches current weather for any location
2. Generates item recommendations based on the weather
3. Finds YouTube videos matching the weather mood
4. Captures detailed traces and metrics for analysis
### **What you'll learn:**
* Building multi-service AI agents
* Integrating with external APIs
* Analyzing agent performance with Galileo observability
The application leverages multiple tools to create its final end result:
* **Weather Retriever** - gets the current weather based on geographic location
* **Recommendations Tool** - generates weather-appropriate item suggestions
* **YouTube Retriever** - calls the YouTube API guided by a prompt to retrieve a video that represents the current "vibes" of the weather
Finally, we'll run this application to demonstrate [Galileo's Agent Evaluation functionality](https://www.galileo.ai/blog/introducing-agentic-evaluations), where it will determine the success of each run and tool call. You can also follow along [on YouTube](https://youtu.be/h6Ui2kpstR4?si=Bek5yPt6vWtyL0U9).
### Requirements
* Python 3.10+ and familiarity with Python
* Package manager (pip or uv recommended)
* OpenAI API Key [get one here](https://platform.openai.com/api-keys)
* WeatherAPI Key [get a free key here](https://www.weatherapi.com)
* YouTube Data API Key [get a free key here](https://developers.google.com/youtube/v3/getting-started)
* A free [Galileo Developer Account](https://app.galileo.ai)
**Note:** This cookbook assumes you have already created an account on [app.galileo.ai](https://app.galileo.ai). If you haven't, take a moment to create your account and set up a new project. Your project name will become the `GALILEO_PROJECT`, while your Log stream will become the `GALILEO_LOG_STREAM`.
### Sample application
To see a completed version of this application and other examples using the Galileo SDK, check out our [SDK Examples Repository](https://github.com/rungalileo/sdk-examples/tree/main/python/agent/weather-vibes-agent).
## Environment setup
**Ingredients:**
* git
* Python environment tools
* Package manager (pip or uv)
**Steps:**
1. **Clone the repository:**
```bash theme={null}
git clone https://github.com/rungalileo/sdk-examples.git
cd sdk-examples/python/agent/weather-vibes-agent
```
2. **Create a virtual environment:**
**Using uv (recommended):**
```bash theme={null}
uv venv .venv
source .venv/bin/activate # On Windows: .venv\Scripts\activate
```
**Using standard Python venv:**
```bash theme={null}
python -m venv .venv
source .venv/bin/activate # On Windows: .venv\Scripts\activate
```
3. **Install dependencies:**
**Using uv:**
```bash theme={null}
uv pip install -r requirements.txt
```
**Using pip:**
```bash theme={null}
pip install -r requirements.txt
```
4. **Set up environment variables:**
Copy the `.env.example` file to `.env` and configure your API keys:
```bash theme={null}
cp .env.example .env
```
Edit the `.env` file with your actual API keys:
```ini theme={null}
# Galileo Environment Variables
# Your Galileo API key
GALILEO_API_KEY=your-galileo-api-key
# Your Galileo project name
GALILEO_PROJECT=your-galileo-project-name
# The name of the Log stream you want to use for logging
GALILEO_LOG_STREAM=your-galileo-log-stream
# Provide the console url below if you are using a
# custom deployment, and not using the free tier, or app.galileo.ai.
# This will look something like “console.galileo.yourcompany.com”.
# GALILEO_CONSOLE_URL=your-galileo-console-url
# OpenAI properties
OPENAI_API_KEY=your-openai-api-key
# Optional. The base URL of your OpenAI deployment.
# Leave this commented out if you are using the default OpenAI API.
# OPENAI_BASE_URL=
# Optional. Your OpenAI organization.
# OPENAI_ORGANIZATION=
# Other keys
WEATHERAPI_KEY=your_weatherapi_key_here
YOUTUBE_API_KEY=your_youtube_key_here
```
**Important:** Replace the placeholder values with your actual API keys. The `GALILEO_PROJECT` and `GALILEO_LOG_STREAM` can be customized to match your Galileo project setup.
## Understanding the agent architecture
The Weather Vibes Agent consists of several key components:
### 🧠 Agent core (`agent/weather_vibes_agent.py`)
Handles the main agent logic, coordinates tools, and processes requests.
### 🛠️ Tools (`tools/`)
Specialized modules for specific tasks:
* **Weather Tool (`tools/weather_tool.py`)**: Fetches weather data from WeatherAPI
* **Recommendations Tool (`tools/recommendation_tool.py`)**: Generates weather-appropriate item suggestions
* **YouTube Tool (`tools/youtube_tool.py`)**: Finds videos matching the weather mood
### 📝 Descriptor (`descriptor.py`)
Defines the agent's capabilities, inputs, outputs, and configuration in a format that the OpenAI model can understand.
### 🔍 Instrumentation (`agent.py`)
Wraps the agent with Galileo monitoring for observability. This is where we add tracing and metrics.
### 📑 Templates (`templates/`)
Contains Jinja templates for generating system prompts.
## Main agent workflow
The main workflow in `agent.py` ties everything together and adds Galileo instrumentation for observability.
**Key Ingredients:**
* Galileo context management
* Logging decorators
* Workflow spans
* Error handling
**How it works:**
1. **Setting Up the Galileo Context:**
```python theme={null}
with galileo_context(log_stream=galileo_log_stream):
# Agent execution happens here
```
This creates a top-level span that captures the entire agent execution.
2. **Creating the Main Workflow Span:**
```python theme={null}
@log(span_type="workflow", name="weather_vibes_agent")
async def run_agent_with_inputs(location, units, mood, recommendations, verbose):
# Agent execution logic
```
This decorator creates a workflow span that tracks the main agent logic.
3. **Tool Execution with Tracing:**
Each tool call is wrapped with its own span for detailed observability:
```python theme={null}
@log(span_type="tool", name="weather_tool")
async def get_weather(weather_tool, location, units="metric"):
"""Get weather data with Galileo tracing"""
result = await weather_tool.execute(location=location, units=units)
return result
```
4. **Result Aggregation:**
Results from all tools are combined into a single response with proper error handling.
**Galileo's Role in Observability:**
The Galileo-instrumented version of the agent includes several span types. Learn more about spans, the atomic unit of logging in Galileo, [in our logging guide](/sdk-api/logging/logging-basics).
* **Entrypoint span**: Contains the entire run with input parameters
* **Workflow span**: Tracks the main agent logic and decision-making
* **Tool spans**: Monitor individual tool performance and success rates
This hierarchical structure lets you analyze the complete flow and identify bottlenecks, errors, or optimization opportunities.
## The weather tool
Let's examine the Weather Tool to understand how it works and where Galileo fits in.
**Key Ingredients:**
* WeatherAPI
* Async HTTP requests
* Error handling
* Response parsing
**How it works:**
1. **API Integration:**
The tool makes requests to the WeatherAPI to get current weather data.
2. **Request Formatting:**
```python theme={null}
url = "http://api.weatherapi.com/v1/current.json"
params = {
"key": api_key,
"q": location,
"days": days,
"aqi": "yes", # Include air quality data
"alerts": "yes" # Include weather alerts
}
```
3. **Response Processing:**
The tool extracts and formats relevant information from the API response:
```python theme={null}
return {
"location": data["location"]["name"],
"temperature": data["current"]["temp_c"],
"feels_like": data["current"]["feelslike_c"],
"humidity": data["current"]["humidity"],
"condition": data["current"]["condition"]["text"],
"description": data["current"]["condition"]["text"],
"icon": data["current"]["condition"]["icon"]
}
```
4. **Error Handling:**
The tool includes robust error handling to gracefully manage API failures and provide meaningful error messages.
**Where Galileo Comes In:**
The tool itself doesn't directly use Galileo. Instead, the main `agent.py` wraps the tool execution with Galileo's `@log` decorator:
```python theme={null}
@log(span_type="tool", name="weather_tool")
async def get_weather(weather_tool, location, units="metric"):
"""Get weather data with Galileo tracing"""
result = await weather_tool.execute(location=location, units=units)
return result
```
This creates a span in Galileo that:
* Captures the input location and units
* Records the tool's output and execution time
* Tracks any errors or warnings
* Provides context for debugging and optimization
## The recommendations tool
This tool generates clothing and item recommendations based on weather conditions using OpenAI's language models.
**Key Ingredients:**
* OpenAI API integration
* Weather condition mapping
* Structured prompt engineering
* Response parsing and validation
**How it works:**
1. **Prompt Engineering:**
The tool constructs a context-aware prompt for the LLM using the weather data:
```python theme={null}
prompt = (
f"Based on the following weather conditions:\n"
f"Location: {weather['location']}\n"
f"Temperature: {weather['temperature']}°{temp_unit}\n"
f"Condition: {weather['condition']}\n"
f"Humidity: {weather['humidity']}%\n\n"
f"Recommend {max_items} items a person should bring or wear. "
f"Return just a simple list of items, no explanations."
)
```
2. **LLM Integration:**
The tool calls OpenAI through the [Galileo Python SDK](https://github.com/rungalileo/galileo-python/) to generate recommendations. The default uses gpt-4o for its success in tool-calling, but you can use any supported model.
3. **Response Processing:**
The tool processes the LLM's response to extract a clean list of recommendations.
**Galileo Integration:**
Similar to the Weather Tool, recommendations are traced with:
```python theme={null}
@log(span_type="tool", name="recommendations_tool")
async def get_recommendations(recommendations_tool, weather, max_items=5):
"""Get recommendations with Galileo tracing"""
result = await recommendations_tool.execute(weather=weather, max_items=max_items)
return result
```
This allows you to analyze:
* How different weather inputs affect recommendations
* LLM response quality
* Processing time
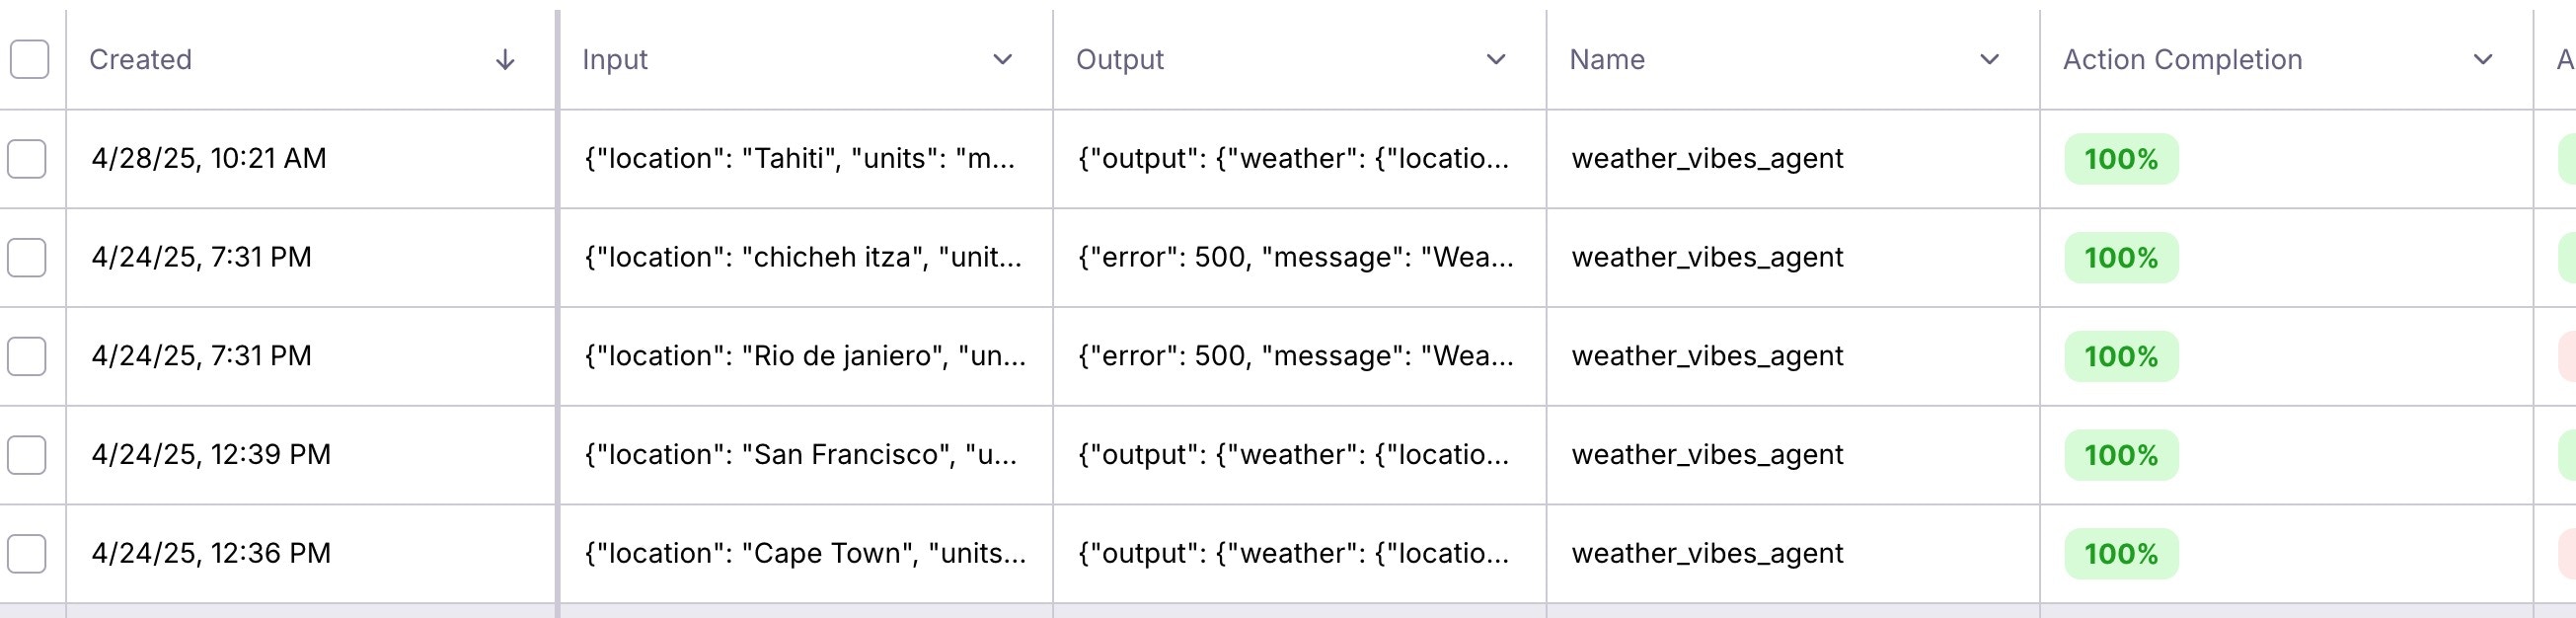
You can see this within the Galileo Log stream as pictured below.
## The YouTube tool
This tool finds videos that match the current weather condition or mood using the YouTube Data API.
**Key Ingredients:**
* YouTube Data API integration
* Weather-to-mood mapping
* Search query construction
* Video selection logic
**How it works:**
1. **Mood Mapping:**
The tool maps weather conditions to appropriate moods for video selection:
```python theme={null}
WEATHER_MOOD_MAP = {
"Clear": ["sunny", "bright", "cheerful"],
"Clouds": ["relaxing", "chill", "ambient"],
"Rain": ["rainy", "cozy", "relaxing"],
"Drizzle": ["light rain", "peaceful", "gentle"],
"Thunderstorm": ["dramatic", "intense", "powerful"],
"Snow": ["winter", "snowfall", "peaceful"],
"Mist": ["foggy", "mysterious", "calm"],
"Fog": ["atmospheric", "misty", "moody"],
}
```
2. **Query Construction:**
The tool builds a YouTube search query based on the weather and mood:
```python theme={null}
query = f"{mood} music {weather_condition.lower()} weather"
```
3. **API Integration:**
The tool searches YouTube and selects an appropriate video.
**Galileo Integration:**
Like the other tools, YouTube searches are traced with:
```python theme={null}
@log(span_type="tool", name="youtube_tool")
async def find_weather_video(youtube_tool, weather_condition, mood_override=None):
"""Find YouTube videos with Galileo tracing"""
result = await youtube_tool.execute(
weather_condition=weather_condition,
mood_override=mood_override
)
return result
```
This helps you monitor:
* YouTube API success rate
* Query effectiveness
* Response times
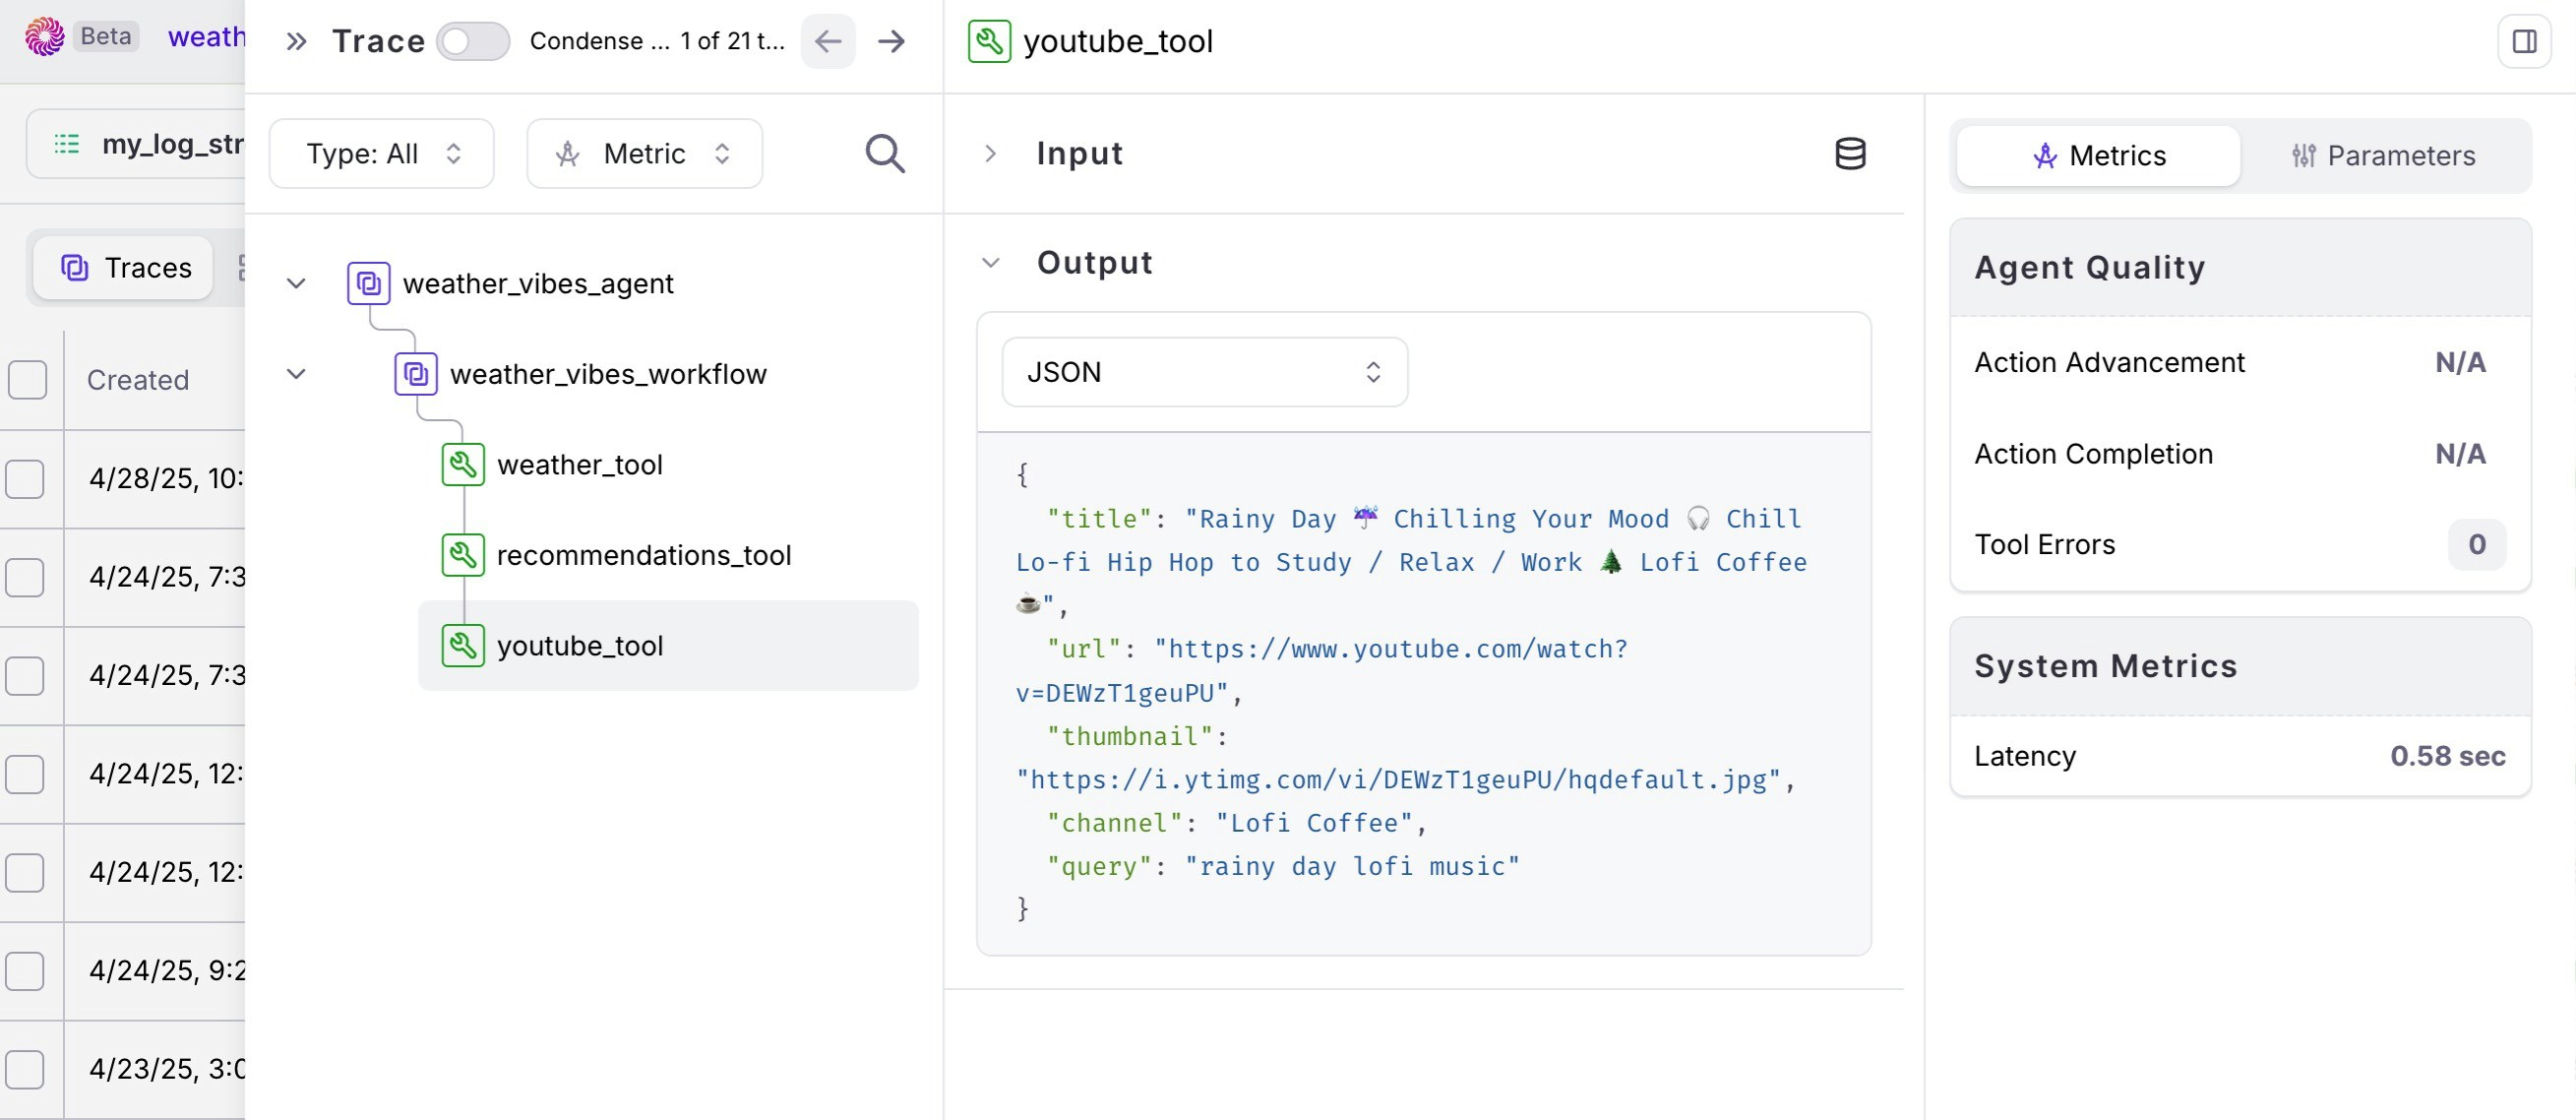
You can see the results of the YouTube tool by opening up an individual span within the Galileo application and reviewing the tool selection and latency.
## Running the agent
Now that you understand how it all works, let's run the agent!
**Steps:**
1. **Basic Usage:**
```bash theme={null}
python agent.py "New York"
```
2. **Advanced Options:**
```bash theme={null}
python agent.py --location "Tokyo" --units imperial --mood relaxing --verbose
```
3. **Expected Output:**
You should see:
* Weather information for the specified location
* Recommendations based on the weather
* A YouTube video matching the weather mood
* Confirmation that Galileo traces have been collected
## Viewing traces in Galileo
Now it's time to see the results of our instrumentation in Galileo!
**Steps:**
1. **Log into Galileo:**
Visit [app.galileo.ai](https://app.galileo.ai) and log in.
2. **Navigate to Your Project:**
* Select your project (e.g., `weather_vibes_agent`)
* Go to the Traces section
* Look for your Log stream (e.g., `weather_vibes_agent`)
3. **View Your Traces:**
* Click on a recent trace to see the detailed execution flow
* Explore the hierarchical structure of spans
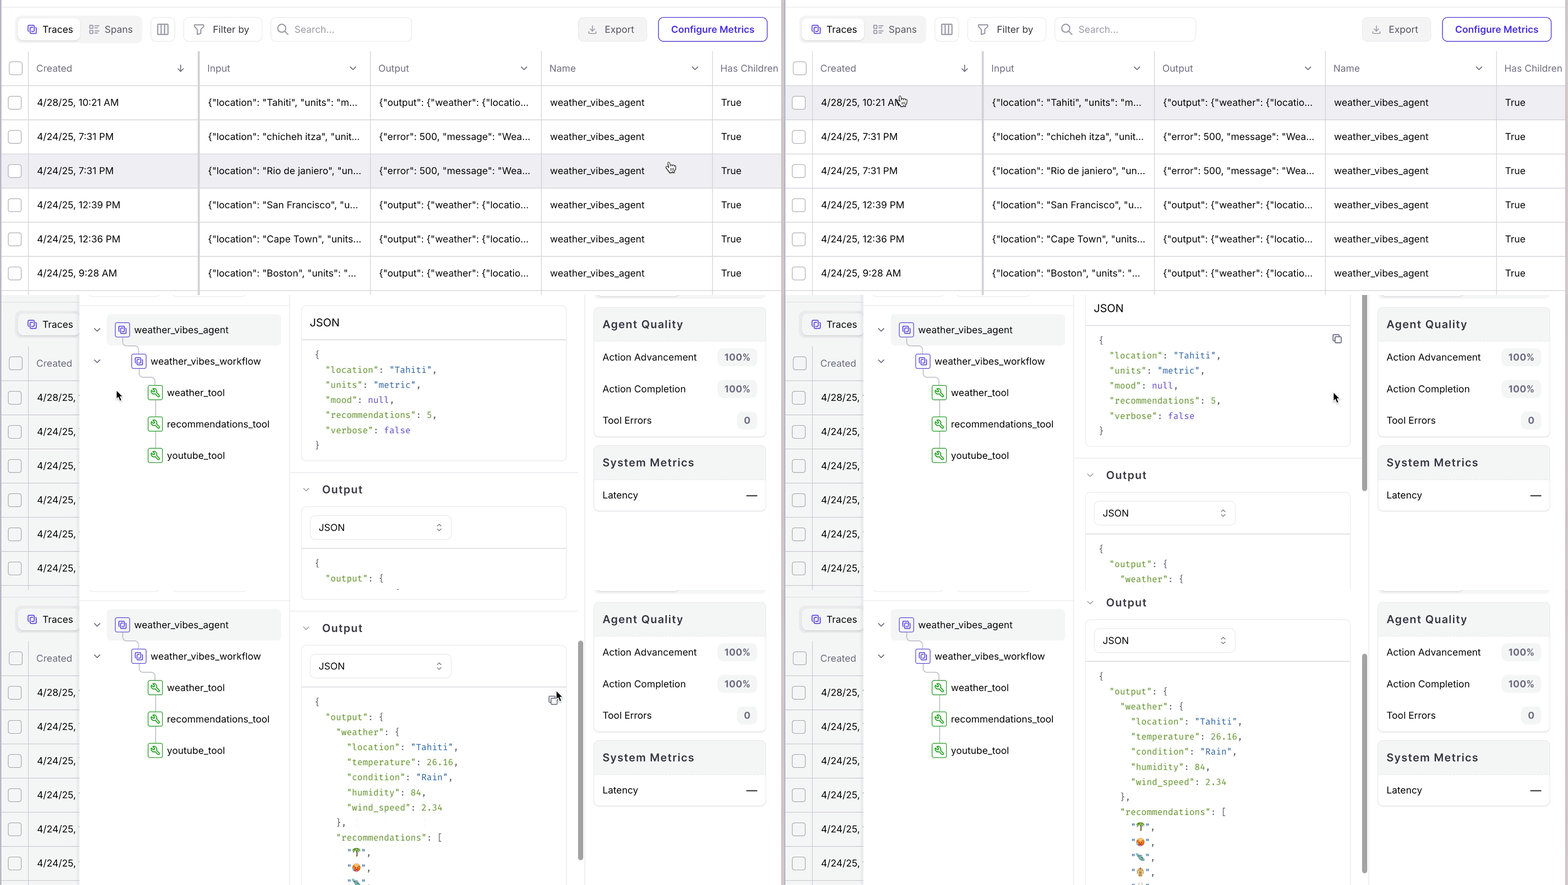
4. **Explore the Hierarchy:**
You'll see a visualization showing:
* The session as a whole
* The workflow span (main agent logic)
* Individual tool spans (weather, recommendations, YouTube)
5. **Analyze Performance:**
In the trace view, you can:
* See the execution time for each component
* View the input and output data for each tool
* Identify any errors or warnings
* Compare multiple runs for performance trends
6. **Identify Optimization Opportunities:**
Look for:
* Slow API calls that could benefit from caching
* Bottlenecks in the workflow
* Error patterns that need better handling
* Response quality issues that could be improved
## Extending the agent
Want to make the Weather Vibes Agent even better? Here are some ideas for extension:
### Add new tools
Create a new tool file in the `tools/` directory:
```python theme={null}
class ForecastTool:
async def execute(self, location, days=5):
# Implement 5-day forecast logic
pass
```
Then add it to your agent workflow with Galileo tracing:
```python theme={null}
@log(span_type="tool", name="forecast_tool")
async def get_forecast(forecast_tool, location, days=5):
"""Get weather forecast with Galileo tracing"""
result = await forecast_tool.execute(location=location, days=days)
return result
```
### Implement caching
Add caching to improve performance and reduce API calls:
```python theme={null}
class WeatherTool:
def __init__(self):
self.cache = {}
self.cache_ttl = 300 # 5 minutes
async def execute(self, location, units="metric"):
cache_key = f"{location}_{units}"
if cache_key in self.cache:
cache_time, data = self.cache[cache_key]
if time.time() - cache_time < self.cache_ttl:
return data
# Normal API call logic
self.cache[cache_key] = result
return result
```
## Conclusion
You've now learned how to build, run, and monitor the Weather Vibes Agent with Galileo!
**Key Takeaways:**
* **Modular Design**: Multi-tool agents can combine various APIs into a unified experience
* **Observability**: Galileo provides valuable insights into agent performance and behavior
* **Structured Tracing**: Well-structured tracing helps identify issues and optimization opportunities
* **Error Handling**: Robust error handling ensures your agent works reliably in production
**Next Steps:**
* Check out the [Galileo YouTube Channel](https://www.youtube.com/@rungalileo) for more tutorials and examples
* Star the [Galileo SDK-examples repo](https://github.com/rungalileo/sdk-examples) to bookmark more ways to get started
* Follow [Galileo on LinkedIn](https://www.linkedin.com/company/galileo-ai/) for the latest news and resources
* Watch the [video walkthrough](https://youtu.be/h6Ui2kpstR4) for a visual guide
Happy building! 🚀
## Common issues and solutions
Here are some problems you might encounter and how to fix them:
### Import errors
**Problem:** `ModuleNotFoundError: No module named 'weather_vibes'`
**Solution:**
* Ensure you're in the correct directory: `sdk-examples/python/agent/weather-vibes-agent`
* Check that all dependencies are installed: `pip install -r requirements.txt`
* Verify your Python environment is activated
### API key issues
**Problem:** "Invalid API key" errors
**Solution:**
* Double-check your `.env` file has the correct API keys
* Ensure API keys are properly formatted (no extra spaces or quotes)
* For WeatherAPI, new keys may take a few minutes to activate
* For YouTube, ensure the API is enabled in Google Cloud Console
### Galileo connection issues
**Problem:** Traces aren't showing up in Galileo
**Solution:**
* Confirm your `GALILEO_API_KEY` is valid and has proper permissions
* Check that `GALILEO_PROJECT`, `GALILEO_LOG_STREAM`, and `GALILEO_CONSOLE_URL` match your Galileo setup
* Verify internet connectivity
* Ensure the Galileo SDK is properly installed: `pip install galileo`
### Template issues
**Problem:** Jinja template errors
**Solution:**
* Ensure the `templates/` directory exists with required template files
* Check template syntax and variable references
* Verify Jinja2 is installed: `pip install Jinja2`
### Performance issues
**Problem:** Slow response times
**Solution:**
* Check API rate limits for WeatherAPI and YouTube
* Consider implementing caching for weather data
* Monitor Galileo traces to identify bottlenecks
* Use async/await properly for concurrent API calls
 ## The YouTube tool
This tool finds videos that match the current weather condition or mood using the YouTube Data API.
**Key Ingredients:**
* YouTube Data API integration
* Weather-to-mood mapping
* Search query construction
* Video selection logic
**How it works:**
1. **Mood Mapping:**
The tool maps weather conditions to appropriate moods for video selection:
```python theme={null}
WEATHER_MOOD_MAP = {
"Clear": ["sunny", "bright", "cheerful"],
"Clouds": ["relaxing", "chill", "ambient"],
"Rain": ["rainy", "cozy", "relaxing"],
"Drizzle": ["light rain", "peaceful", "gentle"],
"Thunderstorm": ["dramatic", "intense", "powerful"],
"Snow": ["winter", "snowfall", "peaceful"],
"Mist": ["foggy", "mysterious", "calm"],
"Fog": ["atmospheric", "misty", "moody"],
}
```
2. **Query Construction:**
The tool builds a YouTube search query based on the weather and mood:
```python theme={null}
query = f"{mood} music {weather_condition.lower()} weather"
```
3. **API Integration:**
The tool searches YouTube and selects an appropriate video.
**Galileo Integration:**
Like the other tools, YouTube searches are traced with:
```python theme={null}
@log(span_type="tool", name="youtube_tool")
async def find_weather_video(youtube_tool, weather_condition, mood_override=None):
"""Find YouTube videos with Galileo tracing"""
result = await youtube_tool.execute(
weather_condition=weather_condition,
mood_override=mood_override
)
return result
```
This helps you monitor:
* YouTube API success rate
* Query effectiveness
* Response times
You can see the results of the YouTube tool by opening up an individual span within the Galileo application and reviewing the tool selection and latency.
## The YouTube tool
This tool finds videos that match the current weather condition or mood using the YouTube Data API.
**Key Ingredients:**
* YouTube Data API integration
* Weather-to-mood mapping
* Search query construction
* Video selection logic
**How it works:**
1. **Mood Mapping:**
The tool maps weather conditions to appropriate moods for video selection:
```python theme={null}
WEATHER_MOOD_MAP = {
"Clear": ["sunny", "bright", "cheerful"],
"Clouds": ["relaxing", "chill", "ambient"],
"Rain": ["rainy", "cozy", "relaxing"],
"Drizzle": ["light rain", "peaceful", "gentle"],
"Thunderstorm": ["dramatic", "intense", "powerful"],
"Snow": ["winter", "snowfall", "peaceful"],
"Mist": ["foggy", "mysterious", "calm"],
"Fog": ["atmospheric", "misty", "moody"],
}
```
2. **Query Construction:**
The tool builds a YouTube search query based on the weather and mood:
```python theme={null}
query = f"{mood} music {weather_condition.lower()} weather"
```
3. **API Integration:**
The tool searches YouTube and selects an appropriate video.
**Galileo Integration:**
Like the other tools, YouTube searches are traced with:
```python theme={null}
@log(span_type="tool", name="youtube_tool")
async def find_weather_video(youtube_tool, weather_condition, mood_override=None):
"""Find YouTube videos with Galileo tracing"""
result = await youtube_tool.execute(
weather_condition=weather_condition,
mood_override=mood_override
)
return result
```
This helps you monitor:
* YouTube API success rate
* Query effectiveness
* Response times
You can see the results of the YouTube tool by opening up an individual span within the Galileo application and reviewing the tool selection and latency.
 ## Running the agent
Now that you understand how it all works, let's run the agent!
**Steps:**
1. **Basic Usage:**
```bash theme={null}
python agent.py "New York"
```
2. **Advanced Options:**
```bash theme={null}
python agent.py --location "Tokyo" --units imperial --mood relaxing --verbose
```
3. **Expected Output:**
You should see:
* Weather information for the specified location
* Recommendations based on the weather
* A YouTube video matching the weather mood
* Confirmation that Galileo traces have been collected
## Viewing traces in Galileo
Now it's time to see the results of our instrumentation in Galileo!
**Steps:**
1. **Log into Galileo:**
Visit [app.galileo.ai](https://app.galileo.ai) and log in.
2. **Navigate to Your Project:**
* Select your project (e.g., `weather_vibes_agent`)
* Go to the Traces section
* Look for your Log stream (e.g., `weather_vibes_agent`)
3. **View Your Traces:**
* Click on a recent trace to see the detailed execution flow
* Explore the hierarchical structure of spans
## Running the agent
Now that you understand how it all works, let's run the agent!
**Steps:**
1. **Basic Usage:**
```bash theme={null}
python agent.py "New York"
```
2. **Advanced Options:**
```bash theme={null}
python agent.py --location "Tokyo" --units imperial --mood relaxing --verbose
```
3. **Expected Output:**
You should see:
* Weather information for the specified location
* Recommendations based on the weather
* A YouTube video matching the weather mood
* Confirmation that Galileo traces have been collected
## Viewing traces in Galileo
Now it's time to see the results of our instrumentation in Galileo!
**Steps:**
1. **Log into Galileo:**
Visit [app.galileo.ai](https://app.galileo.ai) and log in.
2. **Navigate to Your Project:**
* Select your project (e.g., `weather_vibes_agent`)
* Go to the Traces section
* Look for your Log stream (e.g., `weather_vibes_agent`)
3. **View Your Traces:**
* Click on a recent trace to see the detailed execution flow
* Explore the hierarchical structure of spans
 4. **Explore the Hierarchy:**
You'll see a visualization showing:
* The session as a whole
* The workflow span (main agent logic)
* Individual tool spans (weather, recommendations, YouTube)
5. **Analyze Performance:**
In the trace view, you can:
* See the execution time for each component
* View the input and output data for each tool
* Identify any errors or warnings
* Compare multiple runs for performance trends
6. **Identify Optimization Opportunities:**
Look for:
* Slow API calls that could benefit from caching
* Bottlenecks in the workflow
* Error patterns that need better handling
* Response quality issues that could be improved
## Extending the agent
Want to make the Weather Vibes Agent even better? Here are some ideas for extension:
### Add new tools
Create a new tool file in the `tools/` directory:
```python theme={null}
class ForecastTool:
async def execute(self, location, days=5):
# Implement 5-day forecast logic
pass
```
Then add it to your agent workflow with Galileo tracing:
```python theme={null}
@log(span_type="tool", name="forecast_tool")
async def get_forecast(forecast_tool, location, days=5):
"""Get weather forecast with Galileo tracing"""
result = await forecast_tool.execute(location=location, days=days)
return result
```
### Implement caching
Add caching to improve performance and reduce API calls:
```python theme={null}
class WeatherTool:
def __init__(self):
self.cache = {}
self.cache_ttl = 300 # 5 minutes
async def execute(self, location, units="metric"):
cache_key = f"{location}_{units}"
if cache_key in self.cache:
cache_time, data = self.cache[cache_key]
if time.time() - cache_time < self.cache_ttl:
return data
# Normal API call logic
self.cache[cache_key] = result
return result
```
## Conclusion
You've now learned how to build, run, and monitor the Weather Vibes Agent with Galileo!
**Key Takeaways:**
* **Modular Design**: Multi-tool agents can combine various APIs into a unified experience
* **Observability**: Galileo provides valuable insights into agent performance and behavior
* **Structured Tracing**: Well-structured tracing helps identify issues and optimization opportunities
* **Error Handling**: Robust error handling ensures your agent works reliably in production
**Next Steps:**
* Check out the [Galileo YouTube Channel](https://www.youtube.com/@rungalileo) for more tutorials and examples
* Star the [Galileo SDK-examples repo](https://github.com/rungalileo/sdk-examples) to bookmark more ways to get started
* Follow [Galileo on LinkedIn](https://www.linkedin.com/company/galileo-ai/) for the latest news and resources
* Watch the [video walkthrough](https://youtu.be/h6Ui2kpstR4) for a visual guide
Happy building! 🚀
## Common issues and solutions
Here are some problems you might encounter and how to fix them:
### Import errors
**Problem:** `ModuleNotFoundError: No module named 'weather_vibes'`
**Solution:**
* Ensure you're in the correct directory: `sdk-examples/python/agent/weather-vibes-agent`
* Check that all dependencies are installed: `pip install -r requirements.txt`
* Verify your Python environment is activated
### API key issues
**Problem:** "Invalid API key" errors
**Solution:**
* Double-check your `.env` file has the correct API keys
* Ensure API keys are properly formatted (no extra spaces or quotes)
* For WeatherAPI, new keys may take a few minutes to activate
* For YouTube, ensure the API is enabled in Google Cloud Console
### Galileo connection issues
**Problem:** Traces aren't showing up in Galileo
**Solution:**
* Confirm your `GALILEO_API_KEY` is valid and has proper permissions
* Check that `GALILEO_PROJECT`, `GALILEO_LOG_STREAM`, and `GALILEO_CONSOLE_URL` match your Galileo setup
* Verify internet connectivity
* Ensure the Galileo SDK is properly installed: `pip install galileo`
### Template issues
**Problem:** Jinja template errors
**Solution:**
* Ensure the `templates/` directory exists with required template files
* Check template syntax and variable references
* Verify Jinja2 is installed: `pip install Jinja2`
### Performance issues
**Problem:** Slow response times
**Solution:**
* Check API rate limits for WeatherAPI and YouTube
* Consider implementing caching for weather data
* Monitor Galileo traces to identify bottlenecks
* Use async/await properly for concurrent API calls
4. **Explore the Hierarchy:**
You'll see a visualization showing:
* The session as a whole
* The workflow span (main agent logic)
* Individual tool spans (weather, recommendations, YouTube)
5. **Analyze Performance:**
In the trace view, you can:
* See the execution time for each component
* View the input and output data for each tool
* Identify any errors or warnings
* Compare multiple runs for performance trends
6. **Identify Optimization Opportunities:**
Look for:
* Slow API calls that could benefit from caching
* Bottlenecks in the workflow
* Error patterns that need better handling
* Response quality issues that could be improved
## Extending the agent
Want to make the Weather Vibes Agent even better? Here are some ideas for extension:
### Add new tools
Create a new tool file in the `tools/` directory:
```python theme={null}
class ForecastTool:
async def execute(self, location, days=5):
# Implement 5-day forecast logic
pass
```
Then add it to your agent workflow with Galileo tracing:
```python theme={null}
@log(span_type="tool", name="forecast_tool")
async def get_forecast(forecast_tool, location, days=5):
"""Get weather forecast with Galileo tracing"""
result = await forecast_tool.execute(location=location, days=days)
return result
```
### Implement caching
Add caching to improve performance and reduce API calls:
```python theme={null}
class WeatherTool:
def __init__(self):
self.cache = {}
self.cache_ttl = 300 # 5 minutes
async def execute(self, location, units="metric"):
cache_key = f"{location}_{units}"
if cache_key in self.cache:
cache_time, data = self.cache[cache_key]
if time.time() - cache_time < self.cache_ttl:
return data
# Normal API call logic
self.cache[cache_key] = result
return result
```
## Conclusion
You've now learned how to build, run, and monitor the Weather Vibes Agent with Galileo!
**Key Takeaways:**
* **Modular Design**: Multi-tool agents can combine various APIs into a unified experience
* **Observability**: Galileo provides valuable insights into agent performance and behavior
* **Structured Tracing**: Well-structured tracing helps identify issues and optimization opportunities
* **Error Handling**: Robust error handling ensures your agent works reliably in production
**Next Steps:**
* Check out the [Galileo YouTube Channel](https://www.youtube.com/@rungalileo) for more tutorials and examples
* Star the [Galileo SDK-examples repo](https://github.com/rungalileo/sdk-examples) to bookmark more ways to get started
* Follow [Galileo on LinkedIn](https://www.linkedin.com/company/galileo-ai/) for the latest news and resources
* Watch the [video walkthrough](https://youtu.be/h6Ui2kpstR4) for a visual guide
Happy building! 🚀
## Common issues and solutions
Here are some problems you might encounter and how to fix them:
### Import errors
**Problem:** `ModuleNotFoundError: No module named 'weather_vibes'`
**Solution:**
* Ensure you're in the correct directory: `sdk-examples/python/agent/weather-vibes-agent`
* Check that all dependencies are installed: `pip install -r requirements.txt`
* Verify your Python environment is activated
### API key issues
**Problem:** "Invalid API key" errors
**Solution:**
* Double-check your `.env` file has the correct API keys
* Ensure API keys are properly formatted (no extra spaces or quotes)
* For WeatherAPI, new keys may take a few minutes to activate
* For YouTube, ensure the API is enabled in Google Cloud Console
### Galileo connection issues
**Problem:** Traces aren't showing up in Galileo
**Solution:**
* Confirm your `GALILEO_API_KEY` is valid and has proper permissions
* Check that `GALILEO_PROJECT`, `GALILEO_LOG_STREAM`, and `GALILEO_CONSOLE_URL` match your Galileo setup
* Verify internet connectivity
* Ensure the Galileo SDK is properly installed: `pip install galileo`
### Template issues
**Problem:** Jinja template errors
**Solution:**
* Ensure the `templates/` directory exists with required template files
* Check template syntax and variable references
* Verify Jinja2 is installed: `pip install Jinja2`
### Performance issues
**Problem:** Slow response times
**Solution:**
* Check API rate limits for WeatherAPI and YouTube
* Consider implementing caching for weather data
* Monitor Galileo traces to identify bottlenecks
* Use async/await properly for concurrent API calls