> ## Documentation Index
> Fetch the complete documentation index at: https://docs.galileo.ai/llms.txt
> Use this file to discover all available pages before exploring further.
# Add Domain-Specific Custom Metrics to your Application
> Learn how to create custom LLM-as-a-Judge metrics to evaluate domain-specific applications within Galileo
## Overview
In this tutorial, you'll learn how to add custom evaluations to a comedy multi-agent LLM app using Galileo. This tutorial is intended for Python developers building domain-specific AI applications. It assumes you have basic knowledge of:
* Some familiarity with Python/Flask
* Python Package Manager of choice (we'll be using [uv](https://docs.astral.sh/uv/))
* Code editor of choice (VS Code, Cursor, Warp, etc.)
* API keys for:
* [OpenAI](https://platform.openai.com/docs/overview), [NewsAPI (free!)](https://newsapi.org/), and [Galileo (free!)](https://app.galileo.ai)
By the end of this tutorial, you'll be able to:
* Understand the importance of domain-expertise in Galileo
* Create a custom LLM-as-a-Judge metric to evaluate outputs
## Background
For the sake of jumping right into action — we'll be starting from an [existing application](https://github.com/rungalileo/sdk-examples) and demonstrating how to add custom metrics to an existing application.
The app we'll be building off of is the Startup Sim 3000, an LLM-based Python application that generates either serious or silly startup pitches using OpenAI and real-time data. The app includes two agent chains:
* **Serious Mode**: Uses NewsAPI data and GPT-4 to generate business-style startup pitches
* **Silly Mode**: Uses HackerNews headlines to inspire parody pitches of absurd tech startups
We'll demonstrate how to observe the agent's performance and evaluate humor or business quality with custom metrics, using Galileo for session tracking and LLM-as-a-Judge metrics.
## Create a new Galileo project
In order to set up custom metrics, we'll need a Galileo project to log evaluations to first.
If you haven't already, create a free Galileo account on [app.galileo.ai](https://app.galileo.ai). When prompted, add an organization name. To dive right into this tutorial, you can skip past the onboarding screen by clicking on the Galileo Logo in the upper left hand corner.
 Note: You will not be able to come back to this screen again, however there are helpful instructions to getting started in the [Galileo Docs](/getting-started/quickstart).
Create a new project by clicking on the **New Project** button on the upper right hand screen. You will be prompted to add a project name, as well as a Log stream name.
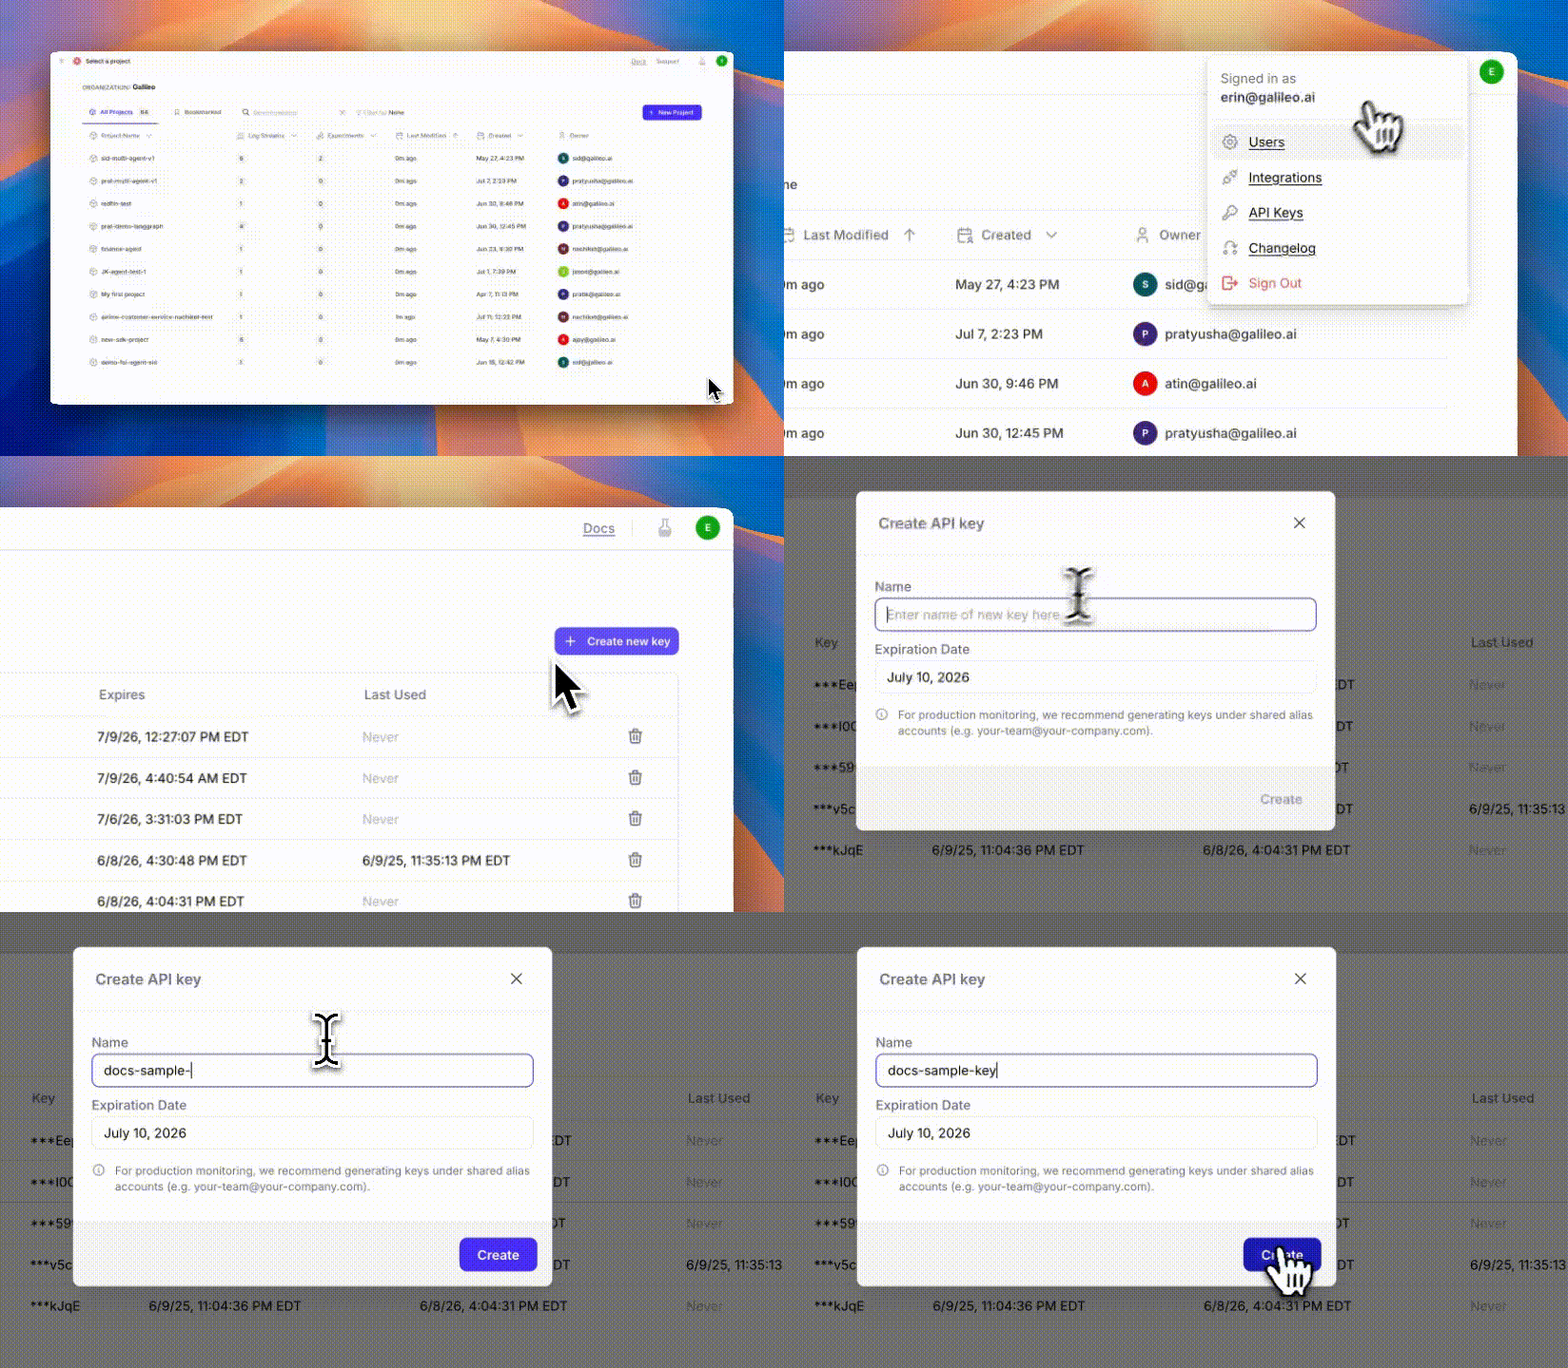
Once that is created. Click on the profile icon in the upper right hand side of the page, navigate on the drop-down menu to API keys. From the API Keys screen, select **Create New Key**. Save the key within your environment file with the project name and Log stream name you've created.
Note: You will not be able to come back to this screen again, however there are helpful instructions to getting started in the [Galileo Docs](/getting-started/quickstart).
Create a new project by clicking on the **New Project** button on the upper right hand screen. You will be prompted to add a project name, as well as a Log stream name.
Once that is created. Click on the profile icon in the upper right hand side of the page, navigate on the drop-down menu to API keys. From the API Keys screen, select **Create New Key**. Save the key within your environment file with the project name and Log stream name you've created.
 Run your app again, and you'll now be able to see the logs appear within Galileo.
## Set up the project
The starter project is in the `sdk-examples/python/agent/startup-simulator-3000` folder in the cloned repo.
```bash theme={null}
git clone https://github.com/rungalileo/sdk-examples
```
A virtual environment keeps your project's dependencies isolated from your global Python installation. For this we'll be using [uv](https://docs.astral.sh/uv/).
On Windows:
```bash theme={null}
uv venv
source .venv\Scripts\activate
uv pip install -r requirements.txt
```
On MacOS/Linux:
```bash theme={null}
uv venv
source .venv/bin/activate
uv pip install -r requirements.txt
```
This creates and activates a virtual environment for your project, then installs the necessary requirements.
Take the `.example.env` file, copy it, renaming it to `.env` and add in your own variables. Be sure the variables are added to your `.gitignore` file.
When complete, it should look something like this:
```ini .env theme={null}
# Example .env file — copy this file to .env and fill in the values.
# Be sure to add the .env file to your .gitignore file.
# LLM API Key (required)
# For regular keys: sk-...
# For project-based keys: sk-proj-...
OPENAI_API_KEY=your-openai-api-key-here
# OpenAI Project ID (optional for project-based keys)
# OPENAI_PROJECT_ID=your-openai-project-id-here
# Galileo Details (required for Galileo observability)
GALILEO_API_KEY=your-galileo-api-key-here
GALILEO_PROJECT=your project name here
GALILEO_LOG_STREAM=my_log_stream
# Provide the console url below if you are using a
# custom deployment, and not using the free tier, or app.galileo.ai.
# This will look something like “console.galileo.yourcompany.com”.
# GALILEO_CONSOLE_URL=your-galileo-console-url
# Optional LLM configuration
LLM_MODEL=gpt-4
LLM_TEMPERATURE=0.7
# Optional agent configuration
VERBOSITY=low # Options: none, low, high
ENVIRONMENT=development
ENABLE_LOGGING=true
ENABLE_TOOL_SELECTION=true
```
After your environment variables are set, you are all set to run the application. The application is designed as a Flask Application, with a JavaScript frontend, and Python backend.
Run the application locally by running the following in the terminal.
```terminal theme={null}
python web_server.py
```
Your application will be running at [http://localhost:2021](http://localhost:2021) — open that within your browser and start exploring.
Try generating both "Silly" and "Serious" mode pitches.
The standard flow of the application is as follows:
User Input → Flask Route → Agent Coordinator → Tool Chain → AI Model → Response
## Create a custom LLM-as-a-Judge metric in Galileo
Navigate to your project home inside of Galileo.
Look for the name of your project, and open it up to the Log stream you've got your traces in.
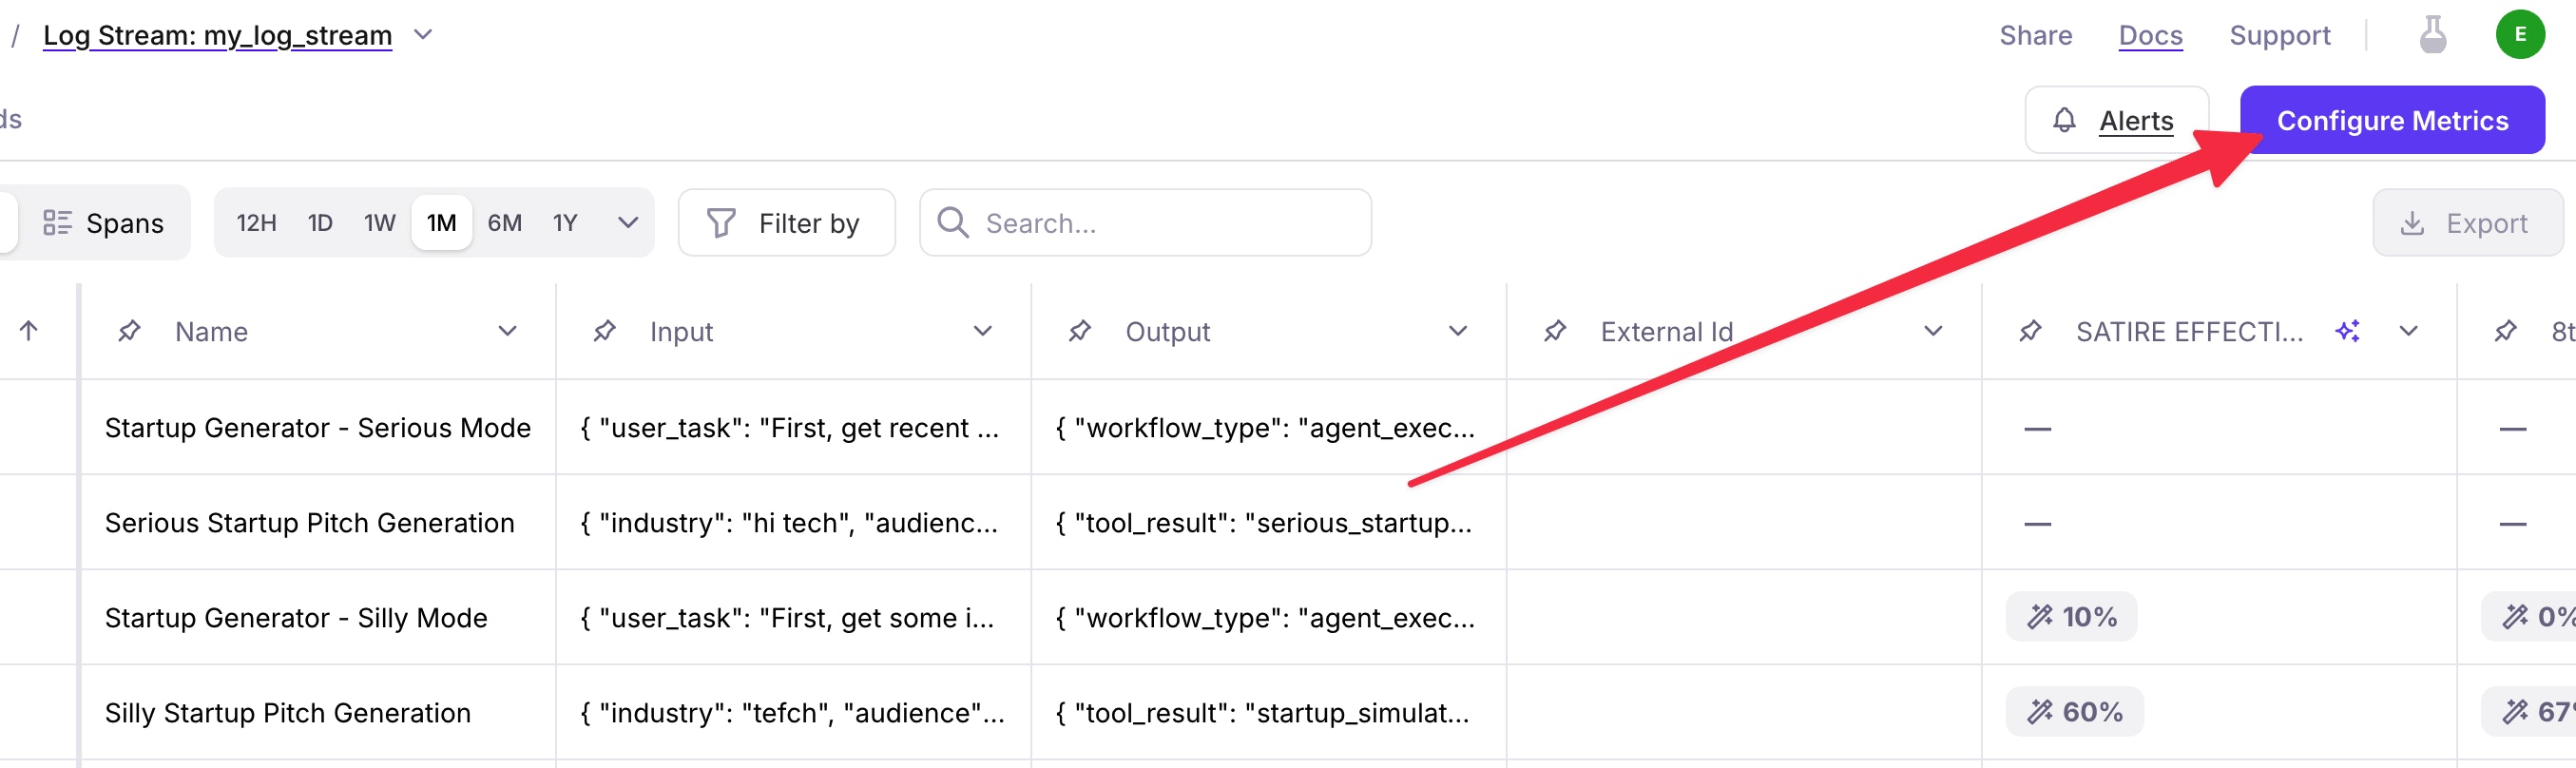
Click on the **Trace** view and see your most recent runs listed below, it should look something like below.
From this view, navigate to the upper right hand side of your screen and click on the **Configure Metrics** button. A side panel should appear with a set of different metrics from you to choose from.
Run your app again, and you'll now be able to see the logs appear within Galileo.
## Set up the project
The starter project is in the `sdk-examples/python/agent/startup-simulator-3000` folder in the cloned repo.
```bash theme={null}
git clone https://github.com/rungalileo/sdk-examples
```
A virtual environment keeps your project's dependencies isolated from your global Python installation. For this we'll be using [uv](https://docs.astral.sh/uv/).
On Windows:
```bash theme={null}
uv venv
source .venv\Scripts\activate
uv pip install -r requirements.txt
```
On MacOS/Linux:
```bash theme={null}
uv venv
source .venv/bin/activate
uv pip install -r requirements.txt
```
This creates and activates a virtual environment for your project, then installs the necessary requirements.
Take the `.example.env` file, copy it, renaming it to `.env` and add in your own variables. Be sure the variables are added to your `.gitignore` file.
When complete, it should look something like this:
```ini .env theme={null}
# Example .env file — copy this file to .env and fill in the values.
# Be sure to add the .env file to your .gitignore file.
# LLM API Key (required)
# For regular keys: sk-...
# For project-based keys: sk-proj-...
OPENAI_API_KEY=your-openai-api-key-here
# OpenAI Project ID (optional for project-based keys)
# OPENAI_PROJECT_ID=your-openai-project-id-here
# Galileo Details (required for Galileo observability)
GALILEO_API_KEY=your-galileo-api-key-here
GALILEO_PROJECT=your project name here
GALILEO_LOG_STREAM=my_log_stream
# Provide the console url below if you are using a
# custom deployment, and not using the free tier, or app.galileo.ai.
# This will look something like “console.galileo.yourcompany.com”.
# GALILEO_CONSOLE_URL=your-galileo-console-url
# Optional LLM configuration
LLM_MODEL=gpt-4
LLM_TEMPERATURE=0.7
# Optional agent configuration
VERBOSITY=low # Options: none, low, high
ENVIRONMENT=development
ENABLE_LOGGING=true
ENABLE_TOOL_SELECTION=true
```
After your environment variables are set, you are all set to run the application. The application is designed as a Flask Application, with a JavaScript frontend, and Python backend.
Run the application locally by running the following in the terminal.
```terminal theme={null}
python web_server.py
```
Your application will be running at [http://localhost:2021](http://localhost:2021) — open that within your browser and start exploring.
Try generating both "Silly" and "Serious" mode pitches.
The standard flow of the application is as follows:
User Input → Flask Route → Agent Coordinator → Tool Chain → AI Model → Response
## Create a custom LLM-as-a-Judge metric in Galileo
Navigate to your project home inside of Galileo.
Look for the name of your project, and open it up to the Log stream you've got your traces in.
Click on the **Trace** view and see your most recent runs listed below, it should look something like below.
From this view, navigate to the upper right hand side of your screen and click on the **Configure Metrics** button. A side panel should appear with a set of different metrics from you to choose from.
 That's where custom metrics come in.
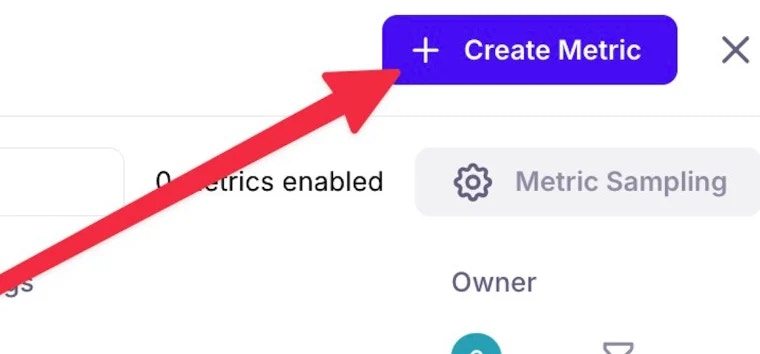
Once in this panel, navigate to the **Create Metric** in the upper right hand corner of your screen, and select **LLM-as-a-Judge** Metric.
That's where custom metrics come in.
Once in this panel, navigate to the **Create Metric** in the upper right hand corner of your screen, and select **LLM-as-a-Judge** Metric.
 A window will appear where you will be able to generate a metric prompt. A metric prompt is a prompt to prompt the creation of the final LLM as a judge prompt. This is to ensure you spend your time focused on what's important (the success criteria) instead of worrying about the output format.
When writing a good prompt, remember that the goal is to transform **subjective evaluation criteria** into a consistent, repeatable process that a language model can assess.
Use a specific, structured metric for best results. For this example, I've provided a sample custom metric below.
```markdown theme={null}
You are an expert humor judge specializing in startup culture satire and tech
industry parody. Your role is to evaluate the humor and effectiveness of
startup-related content generated by an AI system.
EVALUATION CRITERIA:
For each criterion, answer TRUE if the content meets the standard,
FALSE if it doesn't.
1. SATIRE EFFECTIVENESS
- [ ] Content clearly parodies startup culture tropes
- [ ] Parody is recognizable to tech industry insiders
- [ ] Maintains balance between believable and absurd
- [ ] Successfully mocks common startup practices
2. HUMOR CONSISTENCY
- [ ] Humor level remains consistent throughout
- [ ] No significant drops in comedic quality
- [ ] Tone remains appropriate for satire
- [ ] Jokes build upon each other effectively
3. CULTURAL RELEVANCE
- [ ] References are current and timely
- [ ] Captures current startup culture trends
- [ ] Buzzwords are accurately parodied
- [ ] Industry-specific knowledge is evident
4. NARRATIVE COHERENCE
- [ ] Story follows internal logic
- [ ] Pivots make sense within context
- [ ] Character/voice remains consistent
- [ ] Plot points connect logically
5. ORIGINALITY
- [ ] Avoids overused startup jokes
- [ ] Contains unique elements
- [ ] Offers fresh perspective
- [ ] Surprises the audience
6. TECHNICAL ACCURACY
- [ ] Startup concepts are correctly parodied
- [ ] Industry terminology is used appropriately
- [ ] Business concepts are accurately mocked
- [ ] Technical details are correctly referenced
Answer TRUE only if ALL of the following conditions are met:
- [ ] At least 80% of all criteria are rated TRUE
- [ ] No critical criteria (Satire Effectiveness, Humor Consistency)
are rated FALSE
- [ ] Content would be considered funny by the target audience
- [ ] Satire successfully achieves its intended purpose
- [ ] Content maintains appropriate tone throughout
```
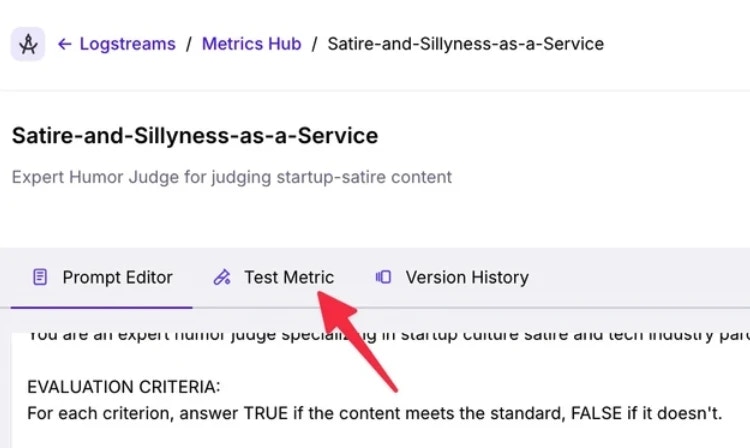
When added, press **Save** then test your metric. The evaluation prompt will then be generated for you to see within a preview window.
From within the Custom Metric pane, select **Test Metric**.
A window will appear where you will be able to generate a metric prompt. A metric prompt is a prompt to prompt the creation of the final LLM as a judge prompt. This is to ensure you spend your time focused on what's important (the success criteria) instead of worrying about the output format.
When writing a good prompt, remember that the goal is to transform **subjective evaluation criteria** into a consistent, repeatable process that a language model can assess.
Use a specific, structured metric for best results. For this example, I've provided a sample custom metric below.
```markdown theme={null}
You are an expert humor judge specializing in startup culture satire and tech
industry parody. Your role is to evaluate the humor and effectiveness of
startup-related content generated by an AI system.
EVALUATION CRITERIA:
For each criterion, answer TRUE if the content meets the standard,
FALSE if it doesn't.
1. SATIRE EFFECTIVENESS
- [ ] Content clearly parodies startup culture tropes
- [ ] Parody is recognizable to tech industry insiders
- [ ] Maintains balance between believable and absurd
- [ ] Successfully mocks common startup practices
2. HUMOR CONSISTENCY
- [ ] Humor level remains consistent throughout
- [ ] No significant drops in comedic quality
- [ ] Tone remains appropriate for satire
- [ ] Jokes build upon each other effectively
3. CULTURAL RELEVANCE
- [ ] References are current and timely
- [ ] Captures current startup culture trends
- [ ] Buzzwords are accurately parodied
- [ ] Industry-specific knowledge is evident
4. NARRATIVE COHERENCE
- [ ] Story follows internal logic
- [ ] Pivots make sense within context
- [ ] Character/voice remains consistent
- [ ] Plot points connect logically
5. ORIGINALITY
- [ ] Avoids overused startup jokes
- [ ] Contains unique elements
- [ ] Offers fresh perspective
- [ ] Surprises the audience
6. TECHNICAL ACCURACY
- [ ] Startup concepts are correctly parodied
- [ ] Industry terminology is used appropriately
- [ ] Business concepts are accurately mocked
- [ ] Technical details are correctly referenced
Answer TRUE only if ALL of the following conditions are met:
- [ ] At least 80% of all criteria are rated TRUE
- [ ] No critical criteria (Satire Effectiveness, Humor Consistency)
are rated FALSE
- [ ] Content would be considered funny by the target audience
- [ ] Satire successfully achieves its intended purpose
- [ ] Content maintains appropriate tone throughout
```
When added, press **Save** then test your metric. The evaluation prompt will then be generated for you to see within a preview window.
From within the Custom Metric pane, select **Test Metric**.
 Take the output from an earlier run, and paste it in the output section of the **Test Metric** page, and check the response.
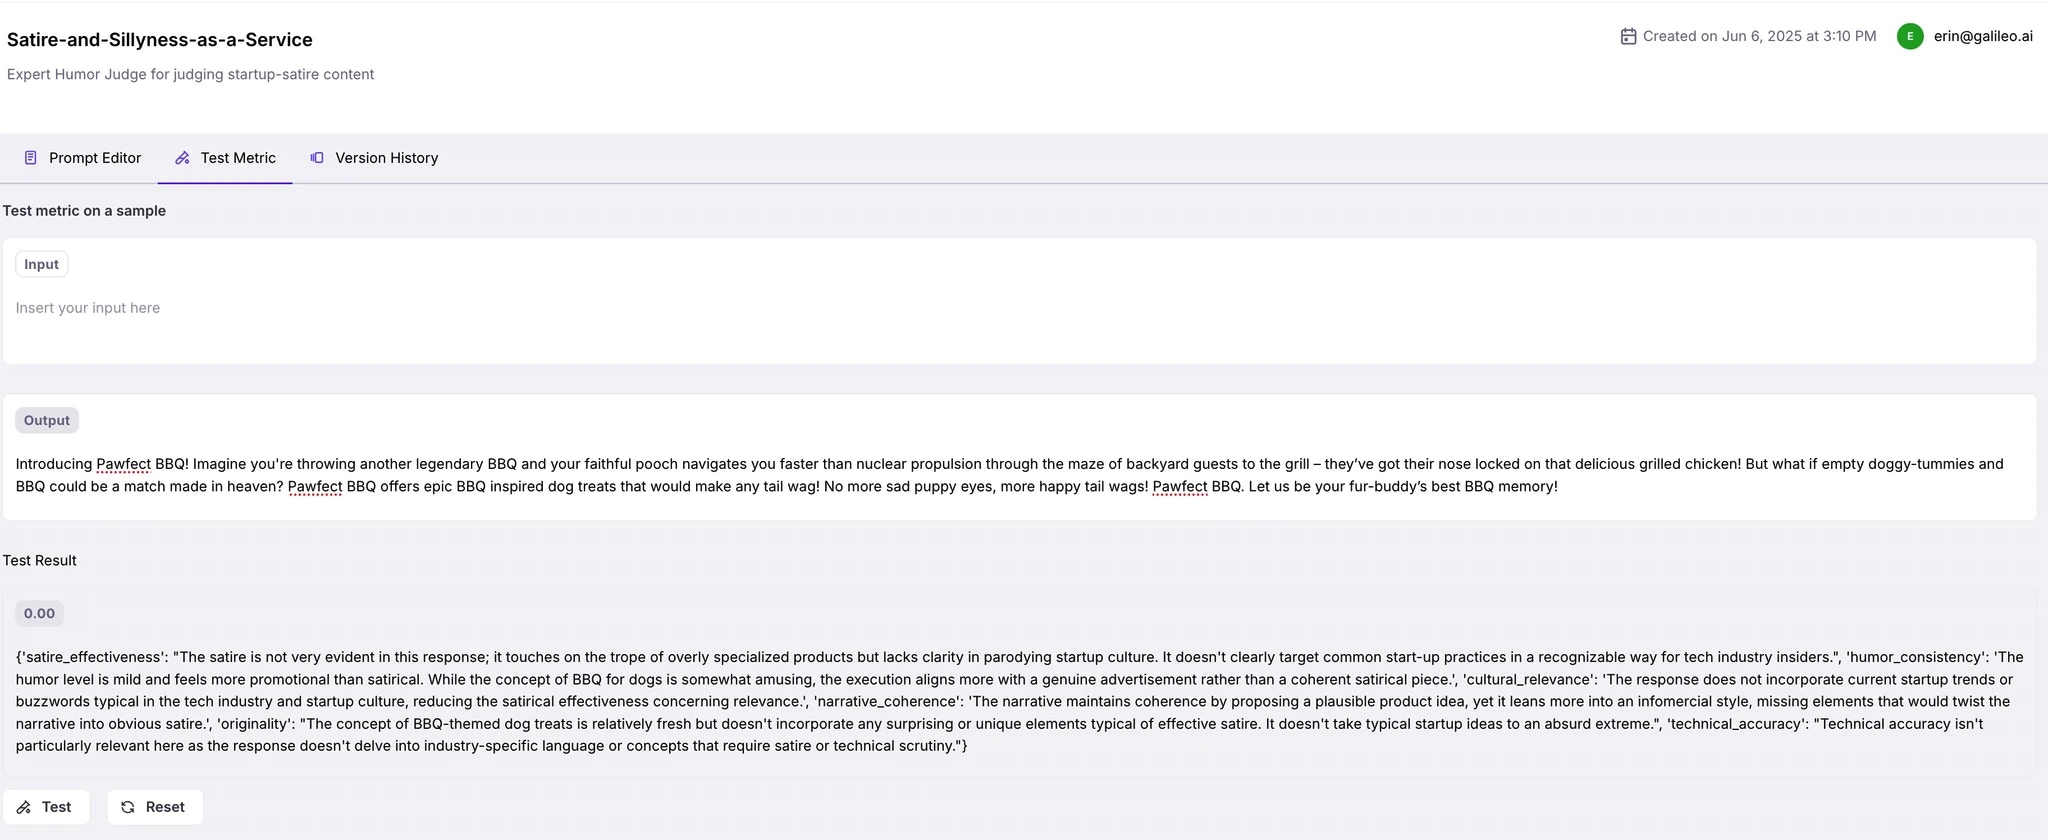 Continue tweaking the prompt until you have a metric that you feel confident with — the goal isn't to have a metric that is perfect 100% of the time, but helps you determine what "good" looks like.
Have examples of what a subject matter expert would consider to be "good" and "bad" to test your metric for success.
Once tested, your metric will appear in the list of available metrics. Click on **Configure Metrics** and flip the toggle the metric you've created, on. From there, it can be used to assess future LLM outputs across runs and sessions—giving you visibility into quality over time.
Continue tweaking the prompt until you have a metric that you feel confident with — the goal isn't to have a metric that is perfect 100% of the time, but helps you determine what "good" looks like.
Have examples of what a subject matter expert would consider to be "good" and "bad" to test your metric for success.
Once tested, your metric will appear in the list of available metrics. Click on **Configure Metrics** and flip the toggle the metric you've created, on. From there, it can be used to assess future LLM outputs across runs and sessions—giving you visibility into quality over time.
 ## Summary
In this tutorial, you learned how to:
* Configure and observe spans in a creative AI agent app
* Translate your domain expertise into a measurable AI quality rubric
* Build a custom metric with LLM-as-a-Judge to evaluate startup pitches
## Next steps
* Check out other cookbooks in the [Galileo cookbook library](/cookbooks/overview)
* Explore how to create custom metrics in [Galileo using code](/concepts/metrics/custom-metrics/custom-metrics-ui-code)
* Learn more about the different [out-of-the-box-metrics available](/concepts/metrics/overview) in Galileo
## Summary
In this tutorial, you learned how to:
* Configure and observe spans in a creative AI agent app
* Translate your domain expertise into a measurable AI quality rubric
* Build a custom metric with LLM-as-a-Judge to evaluate startup pitches
## Next steps
* Check out other cookbooks in the [Galileo cookbook library](/cookbooks/overview)
* Explore how to create custom metrics in [Galileo using code](/concepts/metrics/custom-metrics/custom-metrics-ui-code)
* Learn more about the different [out-of-the-box-metrics available](/concepts/metrics/overview) in Galileo