> ## Documentation Index
> Fetch the complete documentation index at: https://docs.galileo.ai/llms.txt
> Use this file to discover all available pages before exploring further.
# Build a Stripe AI Agent with Galileo Agent Reliability
> Learn how to create a complete AI agent that integrates with Stripe's payment processing API while using Galileo for AI Agent Reliability
## Overview
In this tutorial, you'll learn how to set up and run a complete AI agent that integrates with Stripe's payment processing API via the [Stripe Agent Toolkit](https://github.com/stripe/agent-toolkit) while using [Galileo](https://galileo.ai) for AI Agent Reliability.
This tutorial is intended for TypeScript developers building AI agents with payment processing capabilities.
It assumes you have basic knowledge of:
* Some familiarity with TypeScript, Node.js, and the command line
* Node.js 18+ and npm or yarn
* Code editor of choice (VS Code, Cursor, Warp, etc.)
* API keys for:
* [Galileo](https://app.galileo.ai) (free developer account), [Stripe](https://docs.stripe.com/sandboxes) (free developer sandbox), and [OpenAI](https://platform.openai.com/docs/overview) (should cost less than \$5 to run)
By the end of this tutorial, you'll be able to:
* Set up a complete Stripe AI agent with Galileo observability
* Handle natural language conversations for payment operations
* Track all interactions and performance with Galileo
* Monitor agent reliability and tool usage patterns
## What you'll build
For the sake of jumping right into action — we'll be starting from an [existing TypeScript application](https://github.com/rungalileo/sdk-examples) and demonstrating how to build a complete AI agent with payment processing capabilities.
The Stripe AI Agent is a TypeScript-based application that can handle payment operations through natural language conversations. The agent includes:
* **Product Management**: List products and prices from Stripe
* **Payment Processing**: Create payment links for customers
* **Customer Management**: Handle customer data and operations
* **Natural Language Interface**: Process conversational requests
* **Galileo Observability**: Track all interactions and performance
We'll demonstrate how to observe the agent's performance and evaluate payment processing quality with Galileo's built-in metrics and observability features.
## Prerequisites
Before you start, you'll need to set up accounts and get API keys for the services we'll be using.
### Create a new Galileo project
In order to set up agent reliability tracking, we'll need a Galileo project to log interactions to first.
If you haven't already, create a free Galileo account on [app.galileo.ai](https://app.galileo.ai). When prompted, add an organization name. To dive right into this tutorial, you can skip past the onboarding screen by clicking on the Galileo logo in the upper left hand corner.
Create a new project by clicking on the **New Project** button on the upper right hand screen. You will be prompted to add a project name, as well as a Log stream name.
Note: You will not be able to come back to this screen again, however there are helpful instructions to getting started in the [Galileo Docs](/getting-started/quickstart).
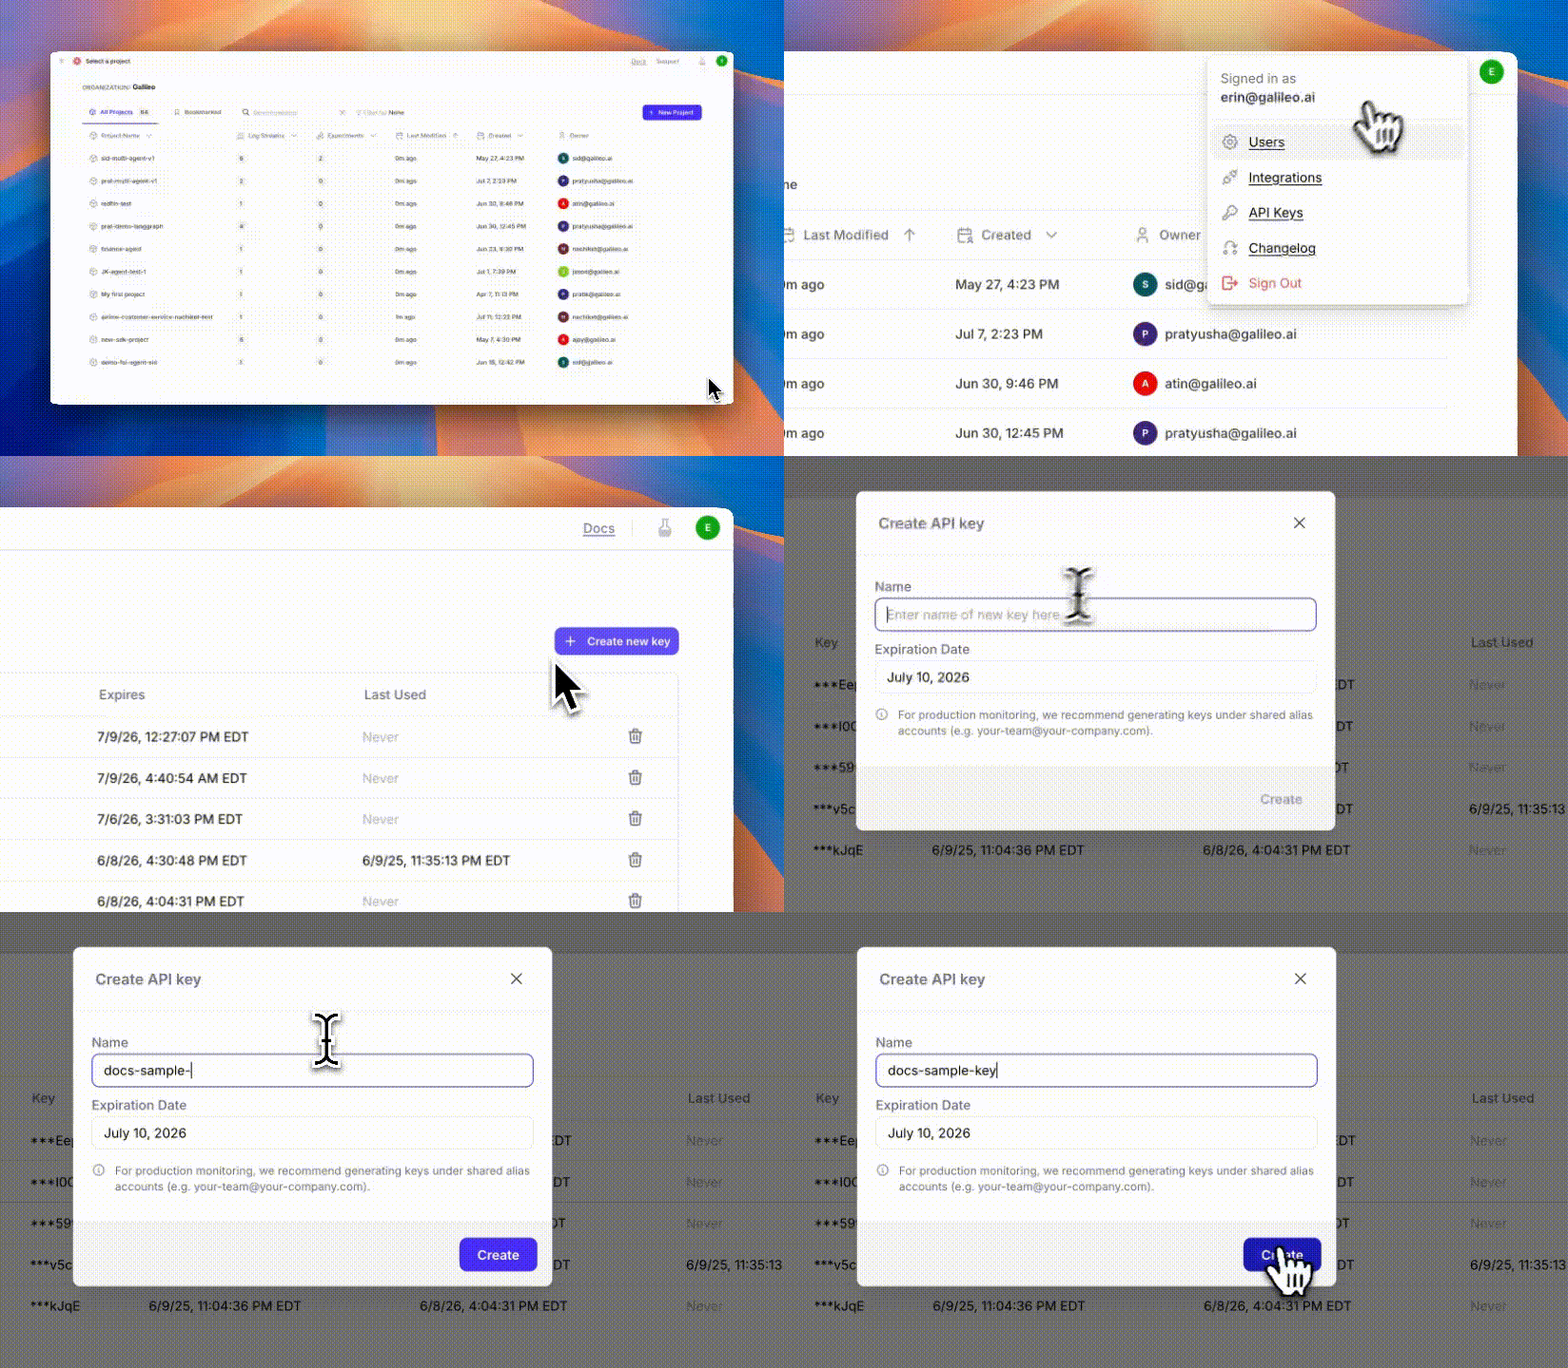
Once that is created, click on the profile icon in the upper right hand side of the page, navigate on the drop-down menu to API keys. From the API Keys screen, select **Create New Key**. Save the key within your environment file with the project name and Log stream name you've created.
 Before running your application, set the metrics you want to track in your application by adding metrics to your Log stream.
Navigate to your project home inside of Galileo.
Look for the name of your project, and open it up to the Log stream you've got your traces in.
Click on the **Trace** view and see your most recent runs listed below, it should look something like below.
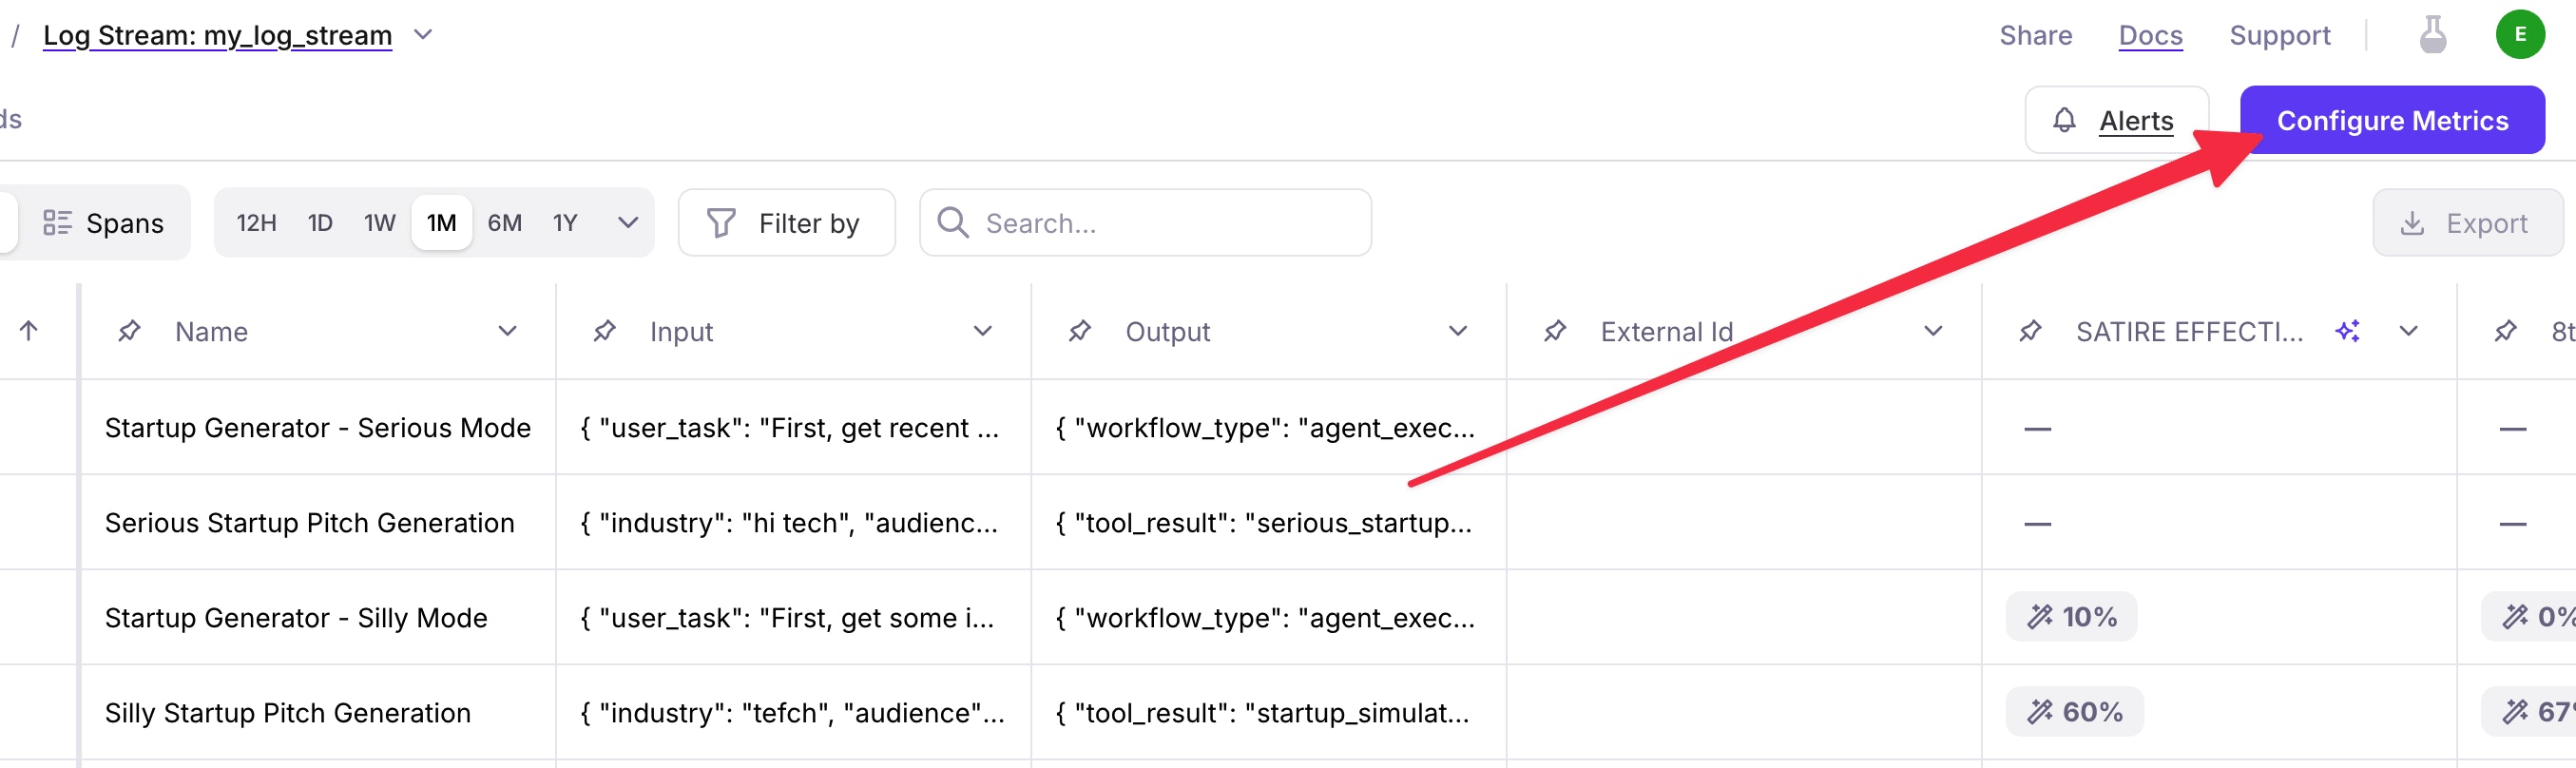
From this view, navigate to the upper right hand side of your screen and click on the **Configure Metrics** button. A side panel should appear with a set of different metrics from you to choose from.
Before running your application, set the metrics you want to track in your application by adding metrics to your Log stream.
Navigate to your project home inside of Galileo.
Look for the name of your project, and open it up to the Log stream you've got your traces in.
Click on the **Trace** view and see your most recent runs listed below, it should look something like below.
From this view, navigate to the upper right hand side of your screen and click on the **Configure Metrics** button. A side panel should appear with a set of different metrics from you to choose from.
 Based on the [Galileo documentation](https://v2docs.galileo.ai/concepts/metrics/overview), here are some suggestions:
* **[Tool Error](https://v2docs.galileo.ai/concepts/metrics/agentic/tool-error)**: Detects errors during tool execution
* **[Tool Selection Quality](https://v2docs.galileo.ai/concepts/metrics/agentic/tool-selection-quality)**: Determines if the agent selected the correct tool and arguments
* **[Context Adherence](/concepts/metrics/rag/generation-quality/context-adherence)**: Measures closed-domain hallucinations
### Create a Stripe Developer Sandbox Account
Go to [Stripe Dashboard](https://dashboard.stripe.com/register) and sign up for a free account. This will give you access to the Stripe sandbox environment for testing.
Navigate to the **Developers** section in your Stripe dashboard on the bottom left hand side of the screen. Copy your test secret key (starts with `sk_test_`) and paste it into your .env file as STRIPE\_SECRET\_KEY.
Note: Make sure you're using the test keys, not the live keys, for this tutorial. The test environment allows you to simulate payments without processing real transactions.
## Set up the project
Now let's get the code and set up your development environment.
The starter project is in the `sdk-examples/typescript/agent/stripe-agent-tool` folder in the cloned repo.
Navigate to the folder using the command line:
```bash theme={null}
git clone https://github.com/rungalileo/sdk-examples
cd typescript/agent/stripe-agent-tool
```
Install the required dependencies for the project.
```bash theme={null}
npm install
```
Copy the example environment file and rename it to `.env`, then add your own API keys. Be sure the variables are added to your `.gitignore` file.
When complete, it should look something like this:
```ini .env theme={null}
# Stripe Configuration
STRIPE_SECRET_KEY=sk_test_your_stripe_secret_key_here
# OpenAI Configuration
OPENAI_API_KEY=your_openai_api_key_here
# Galileo Configuration
GALILEO_API_KEY=your_galileo_api_key_here # Your Galileo API Key
GALILEO_PROJECT=stripe-agent-demo # Your Galileo Project Name
GALILEO_LOG_STREAM=production # Your Galileo Log stream Name
# OPTIONAL
# Provide the console URL below if you are using a custom deployment,
# and not using app.galileo.ai. This is most common with enterprise, or on prem
# deployments where you may have your own custom cluster.
# GALILEO_CONSOLE_URL=https://console.galileo.ai
# OPTIONAL
# Set the verbosity level of the Galileo SDK (from most to least verbose):
# debug, info, warn, error, silent (default)
# GALILEO_LOG_LEVEL=debug
# Agent Configuration
AGENT_NAME=StripePaymentAgent
AGENT_DESCRIPTION=An AI agent that helps with Stripe payment operations
```
Note: Replace the placeholder values with your actual API keys and be sure to have your .gitignore file updated to exclude the .env file.
Compile the application to prepare to run locally on your machine.
```bash theme={null}
npm run build
```
## Running the agent
Now let's start the agent and see it in action!
Start the interactive command-line interface to test your agent:
```bash theme={null}
npm run interactive
```
This will:
* Initialize the agent with Galileo's agent reliability tools
* Start a conversation session
* Allow you to interact with the agent using natural language
**Example interactions:**
```text theme={null}
🚀 You: Show me your products
🤖 Assistant: Here are some of our products...
🚀 You: I want to buy a telescope
🤖 Assistant: I'll help you purchase a telescope...
```
**Available Commands:**
* `help` - Show available commands and examples
* `quit` or `exit` - Exit the application
* `clear` - Clear the terminal screen
* `!end` - Force flush Galileo traces (developer command)
Check out the interface by running it in the browser, aiming to run this locally on your machine.
```bash theme={null}
npm run web
```
The application will run on `http://localhost:3000`
## Observing your agent in Galileo
Now let's see how Galileo tracks your agent's performance and interactions.
### What's tracked
Your agent automatically tracks:
* Conversations and tool usage
* Agent Errors and failure patterns
* Session information
* [Tool selection quality](https://v2docs.galileo.ai/concepts/metrics/agentic/tool-selection-quality) and accuracy
### Viewing your data
Go to your [Galileo Dashboard](https://app.galileo.ai) and navigate to your project.
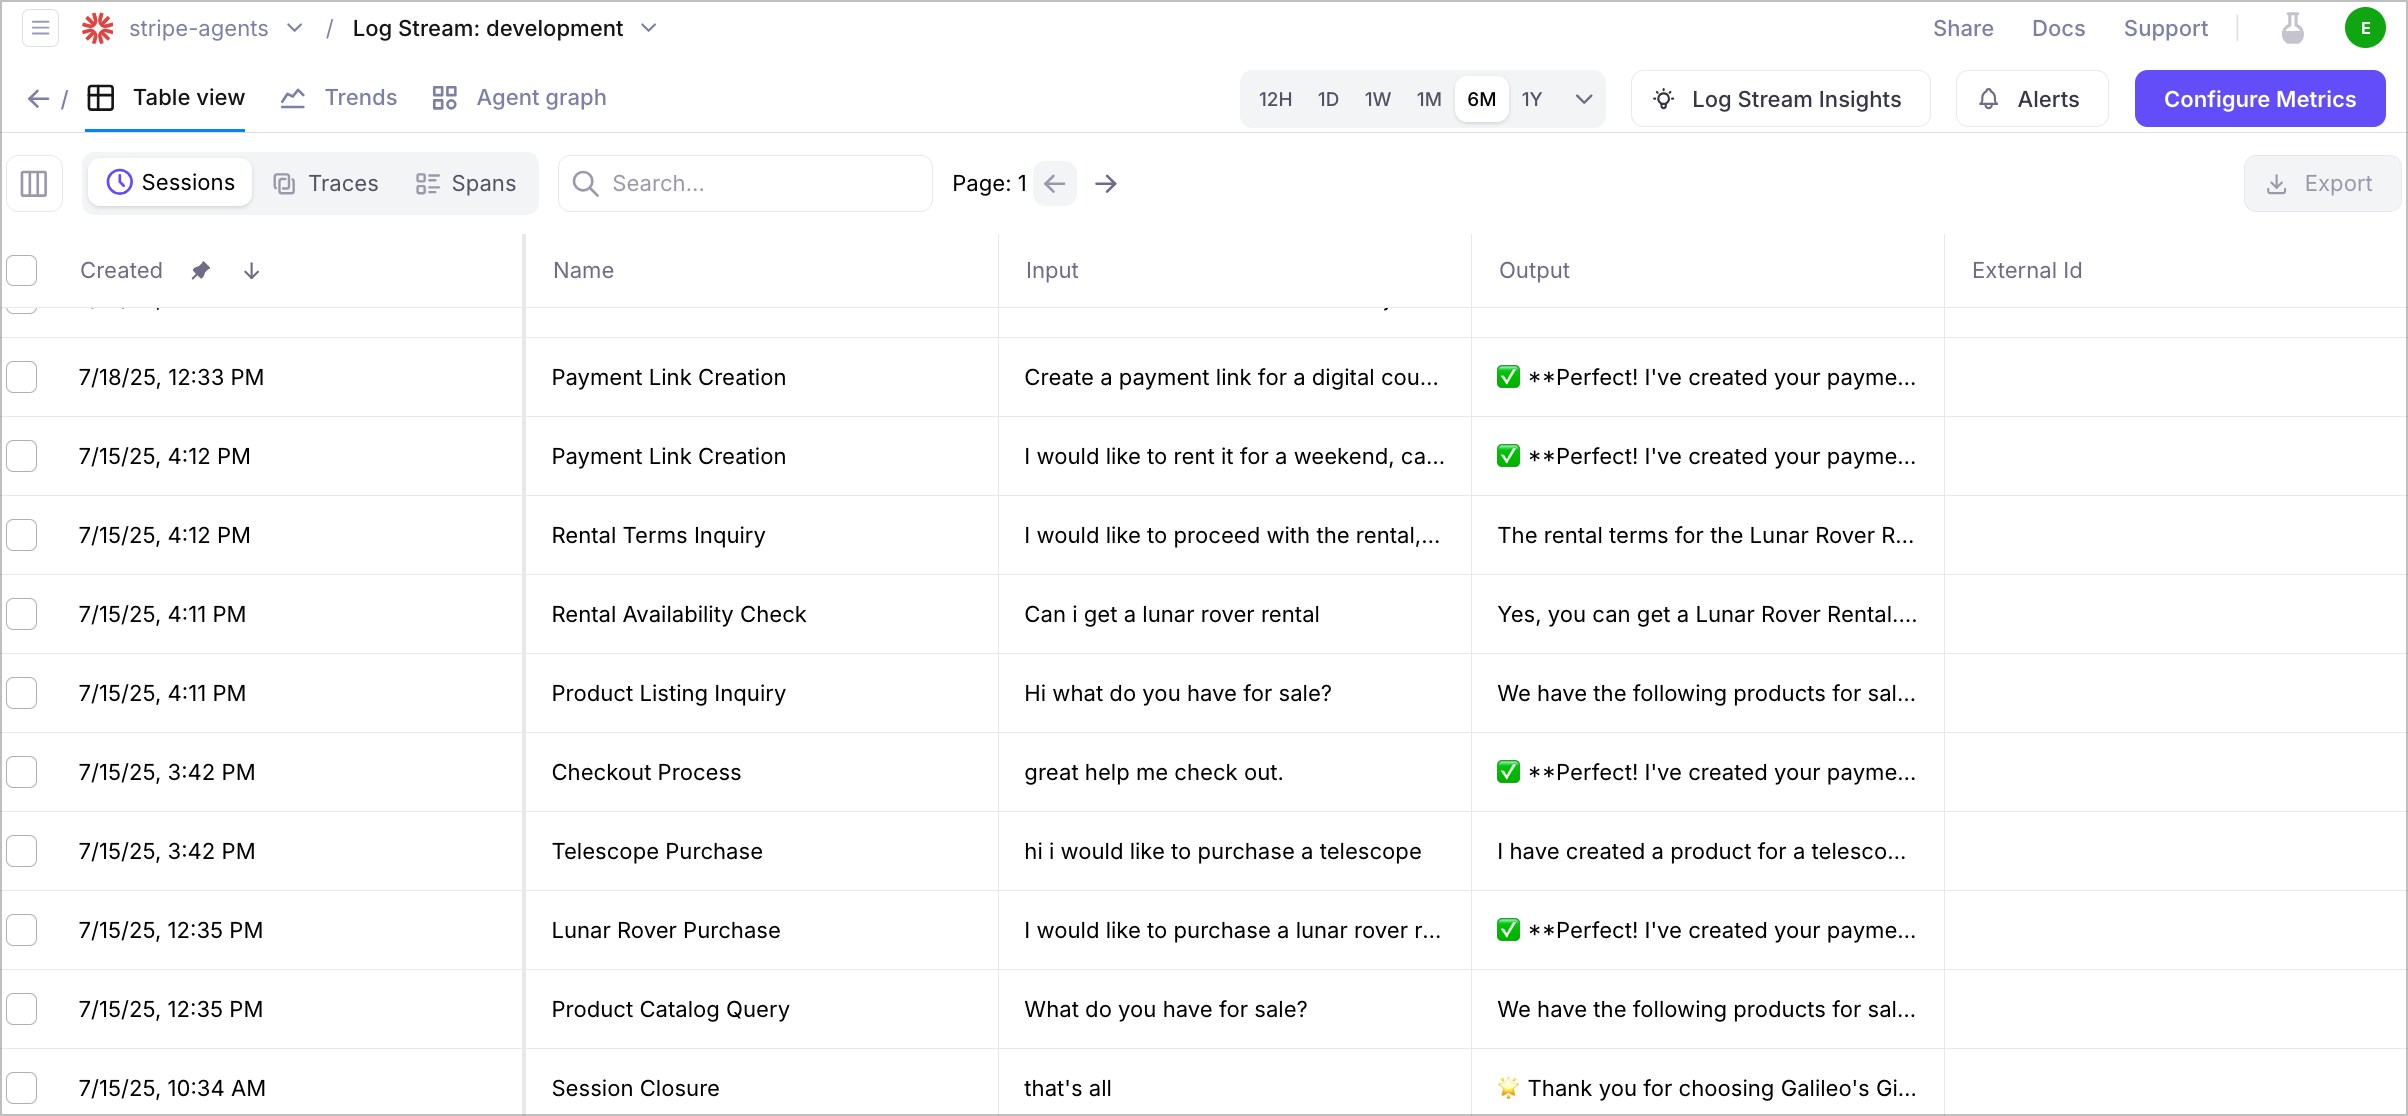
Click on your Log stream to view traces, sessions, and metrics. You'll be able to monitor agent performance over time.
Based on the [Galileo documentation](https://v2docs.galileo.ai/concepts/metrics/overview), here are some suggestions:
* **[Tool Error](https://v2docs.galileo.ai/concepts/metrics/agentic/tool-error)**: Detects errors during tool execution
* **[Tool Selection Quality](https://v2docs.galileo.ai/concepts/metrics/agentic/tool-selection-quality)**: Determines if the agent selected the correct tool and arguments
* **[Context Adherence](/concepts/metrics/rag/generation-quality/context-adherence)**: Measures closed-domain hallucinations
### Create a Stripe Developer Sandbox Account
Go to [Stripe Dashboard](https://dashboard.stripe.com/register) and sign up for a free account. This will give you access to the Stripe sandbox environment for testing.
Navigate to the **Developers** section in your Stripe dashboard on the bottom left hand side of the screen. Copy your test secret key (starts with `sk_test_`) and paste it into your .env file as STRIPE\_SECRET\_KEY.
Note: Make sure you're using the test keys, not the live keys, for this tutorial. The test environment allows you to simulate payments without processing real transactions.
## Set up the project
Now let's get the code and set up your development environment.
The starter project is in the `sdk-examples/typescript/agent/stripe-agent-tool` folder in the cloned repo.
Navigate to the folder using the command line:
```bash theme={null}
git clone https://github.com/rungalileo/sdk-examples
cd typescript/agent/stripe-agent-tool
```
Install the required dependencies for the project.
```bash theme={null}
npm install
```
Copy the example environment file and rename it to `.env`, then add your own API keys. Be sure the variables are added to your `.gitignore` file.
When complete, it should look something like this:
```ini .env theme={null}
# Stripe Configuration
STRIPE_SECRET_KEY=sk_test_your_stripe_secret_key_here
# OpenAI Configuration
OPENAI_API_KEY=your_openai_api_key_here
# Galileo Configuration
GALILEO_API_KEY=your_galileo_api_key_here # Your Galileo API Key
GALILEO_PROJECT=stripe-agent-demo # Your Galileo Project Name
GALILEO_LOG_STREAM=production # Your Galileo Log stream Name
# OPTIONAL
# Provide the console URL below if you are using a custom deployment,
# and not using app.galileo.ai. This is most common with enterprise, or on prem
# deployments where you may have your own custom cluster.
# GALILEO_CONSOLE_URL=https://console.galileo.ai
# OPTIONAL
# Set the verbosity level of the Galileo SDK (from most to least verbose):
# debug, info, warn, error, silent (default)
# GALILEO_LOG_LEVEL=debug
# Agent Configuration
AGENT_NAME=StripePaymentAgent
AGENT_DESCRIPTION=An AI agent that helps with Stripe payment operations
```
Note: Replace the placeholder values with your actual API keys and be sure to have your .gitignore file updated to exclude the .env file.
Compile the application to prepare to run locally on your machine.
```bash theme={null}
npm run build
```
## Running the agent
Now let's start the agent and see it in action!
Start the interactive command-line interface to test your agent:
```bash theme={null}
npm run interactive
```
This will:
* Initialize the agent with Galileo's agent reliability tools
* Start a conversation session
* Allow you to interact with the agent using natural language
**Example interactions:**
```text theme={null}
🚀 You: Show me your products
🤖 Assistant: Here are some of our products...
🚀 You: I want to buy a telescope
🤖 Assistant: I'll help you purchase a telescope...
```
**Available Commands:**
* `help` - Show available commands and examples
* `quit` or `exit` - Exit the application
* `clear` - Clear the terminal screen
* `!end` - Force flush Galileo traces (developer command)
Check out the interface by running it in the browser, aiming to run this locally on your machine.
```bash theme={null}
npm run web
```
The application will run on `http://localhost:3000`
## Observing your agent in Galileo
Now let's see how Galileo tracks your agent's performance and interactions.
### What's tracked
Your agent automatically tracks:
* Conversations and tool usage
* Agent Errors and failure patterns
* Session information
* [Tool selection quality](https://v2docs.galileo.ai/concepts/metrics/agentic/tool-selection-quality) and accuracy
### Viewing your data
Go to your [Galileo Dashboard](https://app.galileo.ai) and navigate to your project.
Click on your Log stream to view traces, sessions, and metrics. You'll be able to monitor agent performance over time.
 ## Understanding the agent architecture
Now that you've seen the agent in action, let's dive deeper into how it works internally.
### Project structure
The project follows a clean, modular architecture designed for maintainability and observability:
```tree theme={null}
src/
├── agents/
│ └── StripeAgent.ts # Main agent implementation
├── config/
│ └── environment.ts # Environment configuration
├── errors/
│ └── CircularToolError.ts # Custom error handling
├── types/
│ └── index.ts # TypeScript type definitions
├── interactive.ts # CLI interface
└── server.ts # Web server
```
### Key components
The Stripe Agent consists of several key components:
#### 🧠 Agent core (`agents/StripeAgent.ts`)
Handles the main agent logic, coordinates tools, and processes requests. This is where the LangChain agent is initialized with Stripe tools and Galileo callbacks.
#### 🛠️ Tools (Stripe Agent Toolkit)
Specialized modules for specific payment operations:
* **Product Tools**: List products and prices from Stripe
* **Payment Tools**: Create payment links and process transactions
* **Customer Tools**: Manage customer data and operations
* **Subscription Tools**: Handle recurring billing operations
#### 📝 Configuration (`config/environment.ts`)
Defines the agent's environment variables and configuration settings for Stripe, OpenAI, and Galileo integration.
#### 🔍 Instrumentation (`interactive.ts` and `server.ts`)
Wraps the agent with Galileo monitoring for observability. This is where we add tracing and metrics.
#### 📑 Types (`types/index.ts`)
Contains TypeScript type definitions for the agent's data structures and API responses.
### Main agent workflow
The main workflow in `agents/StripeAgent.ts` ties everything together and adds Galileo instrumentation for observability.
**Key Ingredients:**
* Galileo context management
* LangChain agent with Stripe tools
* Session tracking
* Error handling and loop prevention
**How it works:**
1. **Setting up the Galileo Callback:**
```typescript theme={null}
await init();
this.galileoCallback = new GalileoCallback();
```
This initializes Galileo and creates a callback handler for tracking agent interactions.
2. **Creating the main agent:**
```typescript theme={null}
private async initializeAgent(): Promise {
const tools = await this.stripeToolkit.getTools();
const prompt = await pull("hwchase17/structured-chat-zero-shot-react");
this.agentExecutor = await createStructuredChatAgent({
llm: this.llm,
tools: allTools,
prompt,
});
}
```
This creates a LangChain agent with Stripe tools and structured chat capabilities.
3. **Tool execution with tracing:**
Each tool call is automatically traced by Galileo through the LangChain callback:
```typescript theme={null}
const result = await this.agentExecutor.invoke({
input: userInput,
callbacks: [this.galileoCallback],
});
```
4. **Session management:**
The agent maintains session context for better user experience:
```typescript theme={null}
private sessionContext: SessionContext | null = null;
interface SessionContext {
sessionId: string;
startTime: Date;
conversationHistory: AgentMessage[];
isActive: boolean;
lastActivity: Date;
messageCount: number;
toolsUsed: Set;
metrics: {
totalExecutionTime: number;
successfulOperations: number;
failedOperations: number;
averageResponseTime?: number;
};
}
```
**Galileo's role in observability:**
The Galileo-instrumented version of the agent includes several span types. Learn more about spans, the atomic unit of logging in Galileo, [in our logging documentation](/sdk-api/logging/logging-basics).
* **Entrypoint span**: Contains the entire conversation session with user inputs
* **Workflow span**: Tracks the main agent logic and decision-making
* **Tool spans**: Monitor individual Stripe API calls and success rates
* **Session spans**: Track conversation context and user interaction patterns
This hierarchical structure lets you analyze the complete payment processing flow and identify bottlenecks, errors, or optimization opportunities.
### The Stripe tools
Let's examine the Stripe tools to understand how they work and where Galileo fits in.
**Key Ingredients:**
* Stripe API integration
* LangChain tool definitions
* Error handling
* Response parsing
**How it works:**
1. **API Integration:**
The tools make requests to the Stripe API to perform payment operations.
2. **Tool Definition:**
```typescript theme={null}
const tools = await this.stripeToolkit.getTools();
```
This gets all available Stripe tools from the [Stripe Agent Toolkit](https://github.com/stripe/agent-toolkit).
3. **Request processing:**
The tools handle various Stripe operations:
* **List products**: Fetches available products and pricing
* **Create payment links**: Generates payment URLs for customers
* **Customer management**: Creates and manages customer records
* **Subscription handling**: Processes recurring billing
4. **Error handling:**
The tools include robust error handling to gracefully manage API failures and provide meaningful error messages.
**Where Galileo comes In:**
The tools themselves don't directly use Galileo. Instead, the main agent wraps tool execution with Galileo's LangChain callback:
```typescript theme={null}
const result = await this.agentExecutor.invoke({
input: userInput,
callbacks: [this.galileoCallback],
});
```
This creates spans in Galileo that:
* Capture the user's natural language input
* Record the agent's tool selection and reasoning
* Track tool execution time and success rates
* Provide context for debugging and optimization
### The conversation memory system
This system provides intelligent caching and context management for improved user experience.
**Key Ingredients:**
* 5-minute caching system
* Session context tracking
* Conversation history management
* Performance optimization
**How it works:**
1. **Caching strategy:**
The agent implements a 5-minute cache for frequently accessed data:
```typescript theme={null}
private cachedProducts: any[] = [];
private cacheTimestamp: number = 0;
private readonly CACHE_DURATION = 5 * 60 * 1000; // 5 minutes
private isCacheValid(): boolean {
return Date.now() - this.cacheTimestamp < this.CACHE_DURATION;
}
```
2. **Session context:**
Each conversation session maintains context for better continuity:
```typescript theme={null}
interface SessionContext {
sessionId: string;
startTime: Date;
conversationHistory: AgentMessage[];
isActive: boolean;
lastActivity: Date;
messageCount: number;
toolsUsed: Set;
metrics: {
totalExecutionTime: number;
successfulOperations: number;
failedOperations: number;
averageResponseTime?: number;
};
}
```
3. **Loop prevention:**
Advanced circular tool usage detection prevents infinite loops:
```typescript theme={null}
private detectCircularToolUsage(intermediateSteps: any[]): void {
if (!intermediateSteps || intermediateSteps.length < 4) return;
const recentTools = intermediateSteps
.slice(-4)
.map(step => step.action?.tool)
.filter(tool => tool);
const [tool1, tool2, tool3, tool4] = recentTools;
if (tool1 === tool3 && tool2 === tool4 && tool1 !== tool2) {
const pattern = [tool1, tool2];
throw new CircularToolError(
`Circular tool invocation detected: ${pattern.join(' -> ')} pattern repeated.`,
pattern
);
}
}
```
**Galileo integration:**
The conversation memory system is traced through session spans that track:
* Session duration and activity patterns
* Conversation flow and context switches
* Tool usage patterns across sessions
* Performance metrics over time
This allows you to analyze:
* How users interact with the payment system
* Common conversation patterns and pain points
* Tool selection effectiveness
## Customization
Now that you understand how the agent works, let's explore how to customize it for your specific needs.
### Adding new tools
To add new Stripe tools, modify the agent initialization:
```typescript theme={null}
private async initializeAgent(): Promise {
// Get tools from Stripe toolkit
const tools = await this.stripeToolkit.getTools();
// Add custom tools if needed
const customTool = new DynamicTool({
name: 'custom_tool',
description: 'Your custom tool description',
func: async (input: string) => {
// Your custom logic here
return 'Custom tool result';
},
});
const allTools = [...tools, customTool];
// Create the agent
const prompt = await pull("hwchase17/structured-chat-zero-shot-react");
this.agentExecutor = await createStructuredChatAgent({
llm: this.llm,
tools: allTools,
prompt,
});
}
```
### Modifying prompts
To customize the agent's behavior, modify the prompt template:
```typescript theme={null}
const customPrompt = ChatPromptTemplate.fromMessages([
["system", "You are a helpful Stripe assistant. Always be polite and professional."],
["human", "{input}"],
["human", "Chat History: {chat_history}"],
]);
```
### Environment variables
Additional configuration options:
```ini theme={null}
# Verbose level of logging (from most to least verbose):
# debug, info, warn, error, silent (default)
GALILEO_LOG_LEVEL=debug
# Custom Galileo console URL (for enterprise deployments)
# GALILEO_CONSOLE_URL=https://console.galileo.ai
# Agent configuration
AGENT_NAME=MyCustomAgent
AGENT_DESCRIPTION=Custom agent description
```
## Troubleshooting
If you encounter issues, here are some common solutions.
### Common issues
Check your .env file exists and verify all required variables are set:
```bash theme={null}
# Check your .env file exists
ls -la .env
# Verify all required variables are set
cat .env | grep -E "(STRIPE|OPENAI|GALILEO)"
```
Check your Galileo API key and internet connection:
```bash theme={null}
# Check your Galileo API key
echo $GALILEO_API_KEY
# Verify internet connection
curl -I https://app.galileo.ai
```
Verify your Stripe key format and test the connection:
```bash theme={null}
# Verify your Stripe key format
echo $STRIPE_SECRET_KEY | grep "sk_test_"
# Test Stripe connection
curl -u $STRIPE_SECRET_KEY: https://api.stripe.com/v1/account
```
Check your OpenAI API key and test the connection:
```bash theme={null}
# Check OpenAI API key
echo $OPENAI_API_KEY
# Test OpenAI connection
curl -H "Authorization: Bearer $OPENAI_API_KEY" \
https://api.openai.com/v1/models
```
### Debug Mode
Enable verbose logging for troubleshooting:
```bash theme={null}
GALILEO_LOG_LEVEL=error npm run interactive
```
### Manual Trace Flushing
Force flush Galileo traces in interactive mode:
```bash theme={null}
# In interactive mode, type:
!end
```
## Summary
In this tutorial, you learned how to:
* Set up a complete Stripe AI agent with Galileo observability
* Handle natural language conversations for payment operations
* Track all interactions and performance with Galileo
* Monitor agent reliability and tool usage patterns
* Customize and extend the agent's capabilities
## Next steps
* Check out other cookbooks in the [Galileo cookbook library](/cookbooks/overview)
* Explore how to create custom metrics in [Galileo using code](/concepts/metrics/custom-metrics/custom-metrics-ui-code)
* Learn more about the different [out-of-the-box-metrics available](/concepts/metrics/overview) in Galileo
* Extend your agent with additional Stripe operations (refunds, subscriptions, etc.)
* Implement user authentication and payment webhook handling
## Understanding the agent architecture
Now that you've seen the agent in action, let's dive deeper into how it works internally.
### Project structure
The project follows a clean, modular architecture designed for maintainability and observability:
```tree theme={null}
src/
├── agents/
│ └── StripeAgent.ts # Main agent implementation
├── config/
│ └── environment.ts # Environment configuration
├── errors/
│ └── CircularToolError.ts # Custom error handling
├── types/
│ └── index.ts # TypeScript type definitions
├── interactive.ts # CLI interface
└── server.ts # Web server
```
### Key components
The Stripe Agent consists of several key components:
#### 🧠 Agent core (`agents/StripeAgent.ts`)
Handles the main agent logic, coordinates tools, and processes requests. This is where the LangChain agent is initialized with Stripe tools and Galileo callbacks.
#### 🛠️ Tools (Stripe Agent Toolkit)
Specialized modules for specific payment operations:
* **Product Tools**: List products and prices from Stripe
* **Payment Tools**: Create payment links and process transactions
* **Customer Tools**: Manage customer data and operations
* **Subscription Tools**: Handle recurring billing operations
#### 📝 Configuration (`config/environment.ts`)
Defines the agent's environment variables and configuration settings for Stripe, OpenAI, and Galileo integration.
#### 🔍 Instrumentation (`interactive.ts` and `server.ts`)
Wraps the agent with Galileo monitoring for observability. This is where we add tracing and metrics.
#### 📑 Types (`types/index.ts`)
Contains TypeScript type definitions for the agent's data structures and API responses.
### Main agent workflow
The main workflow in `agents/StripeAgent.ts` ties everything together and adds Galileo instrumentation for observability.
**Key Ingredients:**
* Galileo context management
* LangChain agent with Stripe tools
* Session tracking
* Error handling and loop prevention
**How it works:**
1. **Setting up the Galileo Callback:**
```typescript theme={null}
await init();
this.galileoCallback = new GalileoCallback();
```
This initializes Galileo and creates a callback handler for tracking agent interactions.
2. **Creating the main agent:**
```typescript theme={null}
private async initializeAgent(): Promise {
const tools = await this.stripeToolkit.getTools();
const prompt = await pull("hwchase17/structured-chat-zero-shot-react");
this.agentExecutor = await createStructuredChatAgent({
llm: this.llm,
tools: allTools,
prompt,
});
}
```
This creates a LangChain agent with Stripe tools and structured chat capabilities.
3. **Tool execution with tracing:**
Each tool call is automatically traced by Galileo through the LangChain callback:
```typescript theme={null}
const result = await this.agentExecutor.invoke({
input: userInput,
callbacks: [this.galileoCallback],
});
```
4. **Session management:**
The agent maintains session context for better user experience:
```typescript theme={null}
private sessionContext: SessionContext | null = null;
interface SessionContext {
sessionId: string;
startTime: Date;
conversationHistory: AgentMessage[];
isActive: boolean;
lastActivity: Date;
messageCount: number;
toolsUsed: Set;
metrics: {
totalExecutionTime: number;
successfulOperations: number;
failedOperations: number;
averageResponseTime?: number;
};
}
```
**Galileo's role in observability:**
The Galileo-instrumented version of the agent includes several span types. Learn more about spans, the atomic unit of logging in Galileo, [in our logging documentation](/sdk-api/logging/logging-basics).
* **Entrypoint span**: Contains the entire conversation session with user inputs
* **Workflow span**: Tracks the main agent logic and decision-making
* **Tool spans**: Monitor individual Stripe API calls and success rates
* **Session spans**: Track conversation context and user interaction patterns
This hierarchical structure lets you analyze the complete payment processing flow and identify bottlenecks, errors, or optimization opportunities.
### The Stripe tools
Let's examine the Stripe tools to understand how they work and where Galileo fits in.
**Key Ingredients:**
* Stripe API integration
* LangChain tool definitions
* Error handling
* Response parsing
**How it works:**
1. **API Integration:**
The tools make requests to the Stripe API to perform payment operations.
2. **Tool Definition:**
```typescript theme={null}
const tools = await this.stripeToolkit.getTools();
```
This gets all available Stripe tools from the [Stripe Agent Toolkit](https://github.com/stripe/agent-toolkit).
3. **Request processing:**
The tools handle various Stripe operations:
* **List products**: Fetches available products and pricing
* **Create payment links**: Generates payment URLs for customers
* **Customer management**: Creates and manages customer records
* **Subscription handling**: Processes recurring billing
4. **Error handling:**
The tools include robust error handling to gracefully manage API failures and provide meaningful error messages.
**Where Galileo comes In:**
The tools themselves don't directly use Galileo. Instead, the main agent wraps tool execution with Galileo's LangChain callback:
```typescript theme={null}
const result = await this.agentExecutor.invoke({
input: userInput,
callbacks: [this.galileoCallback],
});
```
This creates spans in Galileo that:
* Capture the user's natural language input
* Record the agent's tool selection and reasoning
* Track tool execution time and success rates
* Provide context for debugging and optimization
### The conversation memory system
This system provides intelligent caching and context management for improved user experience.
**Key Ingredients:**
* 5-minute caching system
* Session context tracking
* Conversation history management
* Performance optimization
**How it works:**
1. **Caching strategy:**
The agent implements a 5-minute cache for frequently accessed data:
```typescript theme={null}
private cachedProducts: any[] = [];
private cacheTimestamp: number = 0;
private readonly CACHE_DURATION = 5 * 60 * 1000; // 5 minutes
private isCacheValid(): boolean {
return Date.now() - this.cacheTimestamp < this.CACHE_DURATION;
}
```
2. **Session context:**
Each conversation session maintains context for better continuity:
```typescript theme={null}
interface SessionContext {
sessionId: string;
startTime: Date;
conversationHistory: AgentMessage[];
isActive: boolean;
lastActivity: Date;
messageCount: number;
toolsUsed: Set;
metrics: {
totalExecutionTime: number;
successfulOperations: number;
failedOperations: number;
averageResponseTime?: number;
};
}
```
3. **Loop prevention:**
Advanced circular tool usage detection prevents infinite loops:
```typescript theme={null}
private detectCircularToolUsage(intermediateSteps: any[]): void {
if (!intermediateSteps || intermediateSteps.length < 4) return;
const recentTools = intermediateSteps
.slice(-4)
.map(step => step.action?.tool)
.filter(tool => tool);
const [tool1, tool2, tool3, tool4] = recentTools;
if (tool1 === tool3 && tool2 === tool4 && tool1 !== tool2) {
const pattern = [tool1, tool2];
throw new CircularToolError(
`Circular tool invocation detected: ${pattern.join(' -> ')} pattern repeated.`,
pattern
);
}
}
```
**Galileo integration:**
The conversation memory system is traced through session spans that track:
* Session duration and activity patterns
* Conversation flow and context switches
* Tool usage patterns across sessions
* Performance metrics over time
This allows you to analyze:
* How users interact with the payment system
* Common conversation patterns and pain points
* Tool selection effectiveness
## Customization
Now that you understand how the agent works, let's explore how to customize it for your specific needs.
### Adding new tools
To add new Stripe tools, modify the agent initialization:
```typescript theme={null}
private async initializeAgent(): Promise {
// Get tools from Stripe toolkit
const tools = await this.stripeToolkit.getTools();
// Add custom tools if needed
const customTool = new DynamicTool({
name: 'custom_tool',
description: 'Your custom tool description',
func: async (input: string) => {
// Your custom logic here
return 'Custom tool result';
},
});
const allTools = [...tools, customTool];
// Create the agent
const prompt = await pull("hwchase17/structured-chat-zero-shot-react");
this.agentExecutor = await createStructuredChatAgent({
llm: this.llm,
tools: allTools,
prompt,
});
}
```
### Modifying prompts
To customize the agent's behavior, modify the prompt template:
```typescript theme={null}
const customPrompt = ChatPromptTemplate.fromMessages([
["system", "You are a helpful Stripe assistant. Always be polite and professional."],
["human", "{input}"],
["human", "Chat History: {chat_history}"],
]);
```
### Environment variables
Additional configuration options:
```ini theme={null}
# Verbose level of logging (from most to least verbose):
# debug, info, warn, error, silent (default)
GALILEO_LOG_LEVEL=debug
# Custom Galileo console URL (for enterprise deployments)
# GALILEO_CONSOLE_URL=https://console.galileo.ai
# Agent configuration
AGENT_NAME=MyCustomAgent
AGENT_DESCRIPTION=Custom agent description
```
## Troubleshooting
If you encounter issues, here are some common solutions.
### Common issues
Check your .env file exists and verify all required variables are set:
```bash theme={null}
# Check your .env file exists
ls -la .env
# Verify all required variables are set
cat .env | grep -E "(STRIPE|OPENAI|GALILEO)"
```
Check your Galileo API key and internet connection:
```bash theme={null}
# Check your Galileo API key
echo $GALILEO_API_KEY
# Verify internet connection
curl -I https://app.galileo.ai
```
Verify your Stripe key format and test the connection:
```bash theme={null}
# Verify your Stripe key format
echo $STRIPE_SECRET_KEY | grep "sk_test_"
# Test Stripe connection
curl -u $STRIPE_SECRET_KEY: https://api.stripe.com/v1/account
```
Check your OpenAI API key and test the connection:
```bash theme={null}
# Check OpenAI API key
echo $OPENAI_API_KEY
# Test OpenAI connection
curl -H "Authorization: Bearer $OPENAI_API_KEY" \
https://api.openai.com/v1/models
```
### Debug Mode
Enable verbose logging for troubleshooting:
```bash theme={null}
GALILEO_LOG_LEVEL=error npm run interactive
```
### Manual Trace Flushing
Force flush Galileo traces in interactive mode:
```bash theme={null}
# In interactive mode, type:
!end
```
## Summary
In this tutorial, you learned how to:
* Set up a complete Stripe AI agent with Galileo observability
* Handle natural language conversations for payment operations
* Track all interactions and performance with Galileo
* Monitor agent reliability and tool usage patterns
* Customize and extend the agent's capabilities
## Next steps
* Check out other cookbooks in the [Galileo cookbook library](/cookbooks/overview)
* Explore how to create custom metrics in [Galileo using code](/concepts/metrics/custom-metrics/custom-metrics-ui-code)
* Learn more about the different [out-of-the-box-metrics available](/concepts/metrics/overview) in Galileo
* Extend your agent with additional Stripe operations (refunds, subscriptions, etc.)
* Implement user authentication and payment webhook handling